A post about Taking Over Building a TV Network for BSides Cape Town 2023, along with links to the code etc.
This year at BSides Cape Town they ran an awesome Scavenger Hunt where you had to solve clues, perform tasks and scan as many QR codes as possible. The scavenger hunt backend was written by my good friend HypnZA.
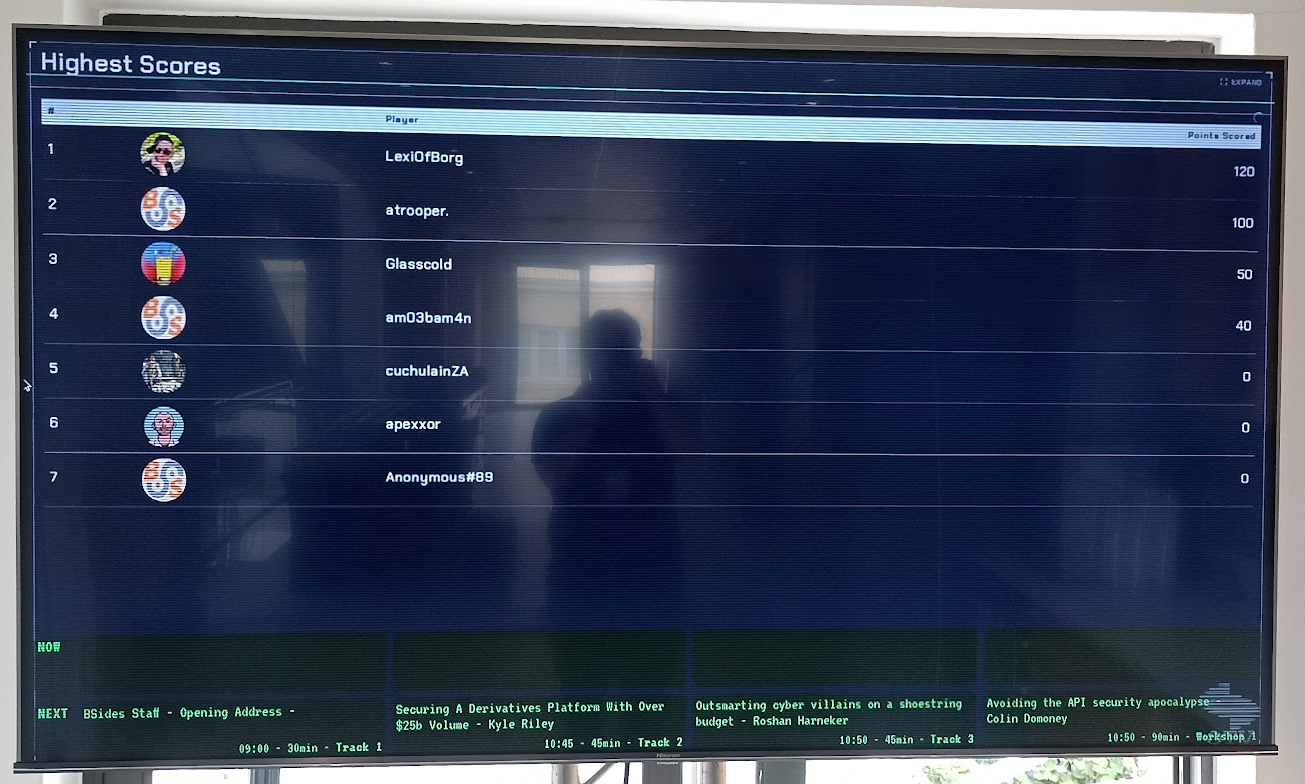
Part of the scavenger hunt was a scoreboard showing the scores and we thought it would be cool to show that score board off some how so they hired 4 large TV’s and I volunteered to get the scoreboard to appear on them.
⚠️ Disclaimer ⚠️
All of this was done incredible quickly, all last minute and while also putting the finishing touches on my talk (A Practical Supply Chain Hack). This isn’t the best designed system, the most robust system or anything like that. It was quickly hacked together with what I had, to do a job for one day for 4 TV’s.
But it worked, and it worked incredibly well given how hacked together it was.
You’ll find the code, as terrible as it is, at dalenunns/bsides-2023-scoreboard: BSides Cape Town 2023 - Code to run Scoreboards
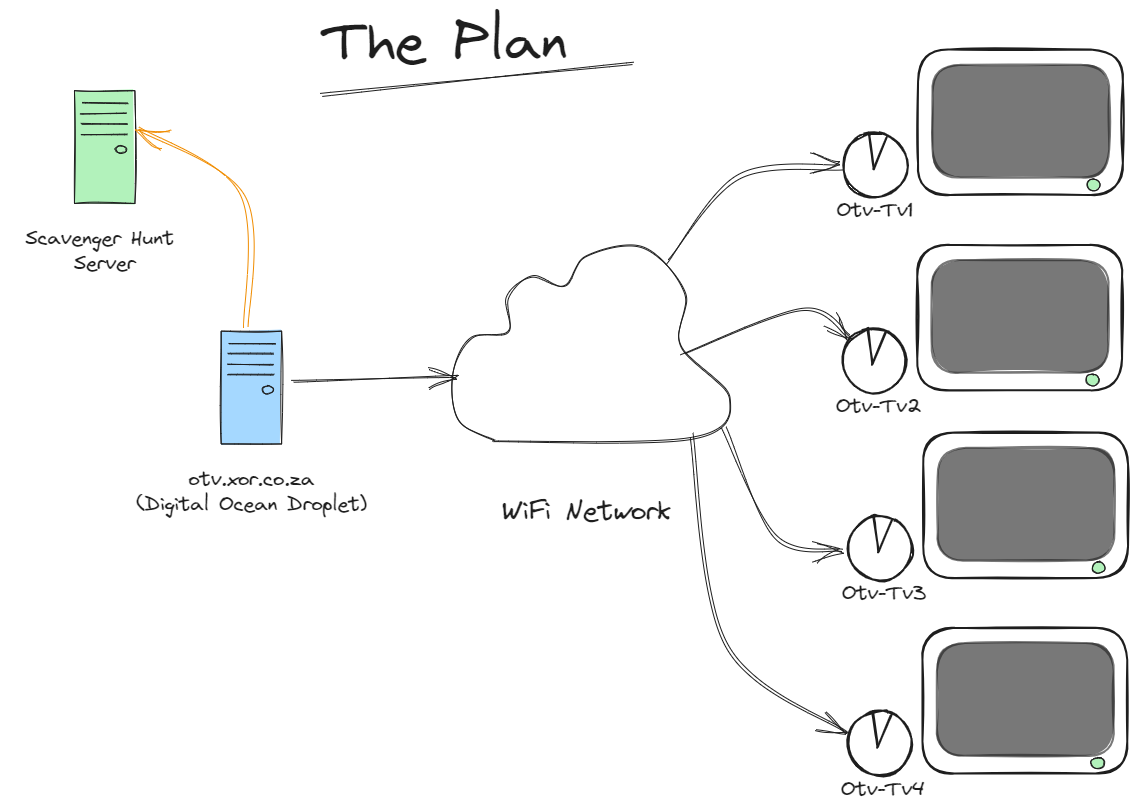 My plan was simple, I had some Raspberry Pi Zero 2W’s so those would be used on the TV side with the backend getting hosted on a Digital Ocean droplet. Then we’ll use the venue’s Wi-Fi network to connect to the droplet and hope and pray it stays up.
Hardware
Each Pi Zero 2W was configured to start-up, auto login and load otv.xor.co.za in a full screen browser session. I configured them to use Epiphany Browser as Chromium was too resource hungry, unfortunately Epiphany doesn’t have a kiosk mode, if I was doing this again I would use a browser that had some kind of kiosk mode.
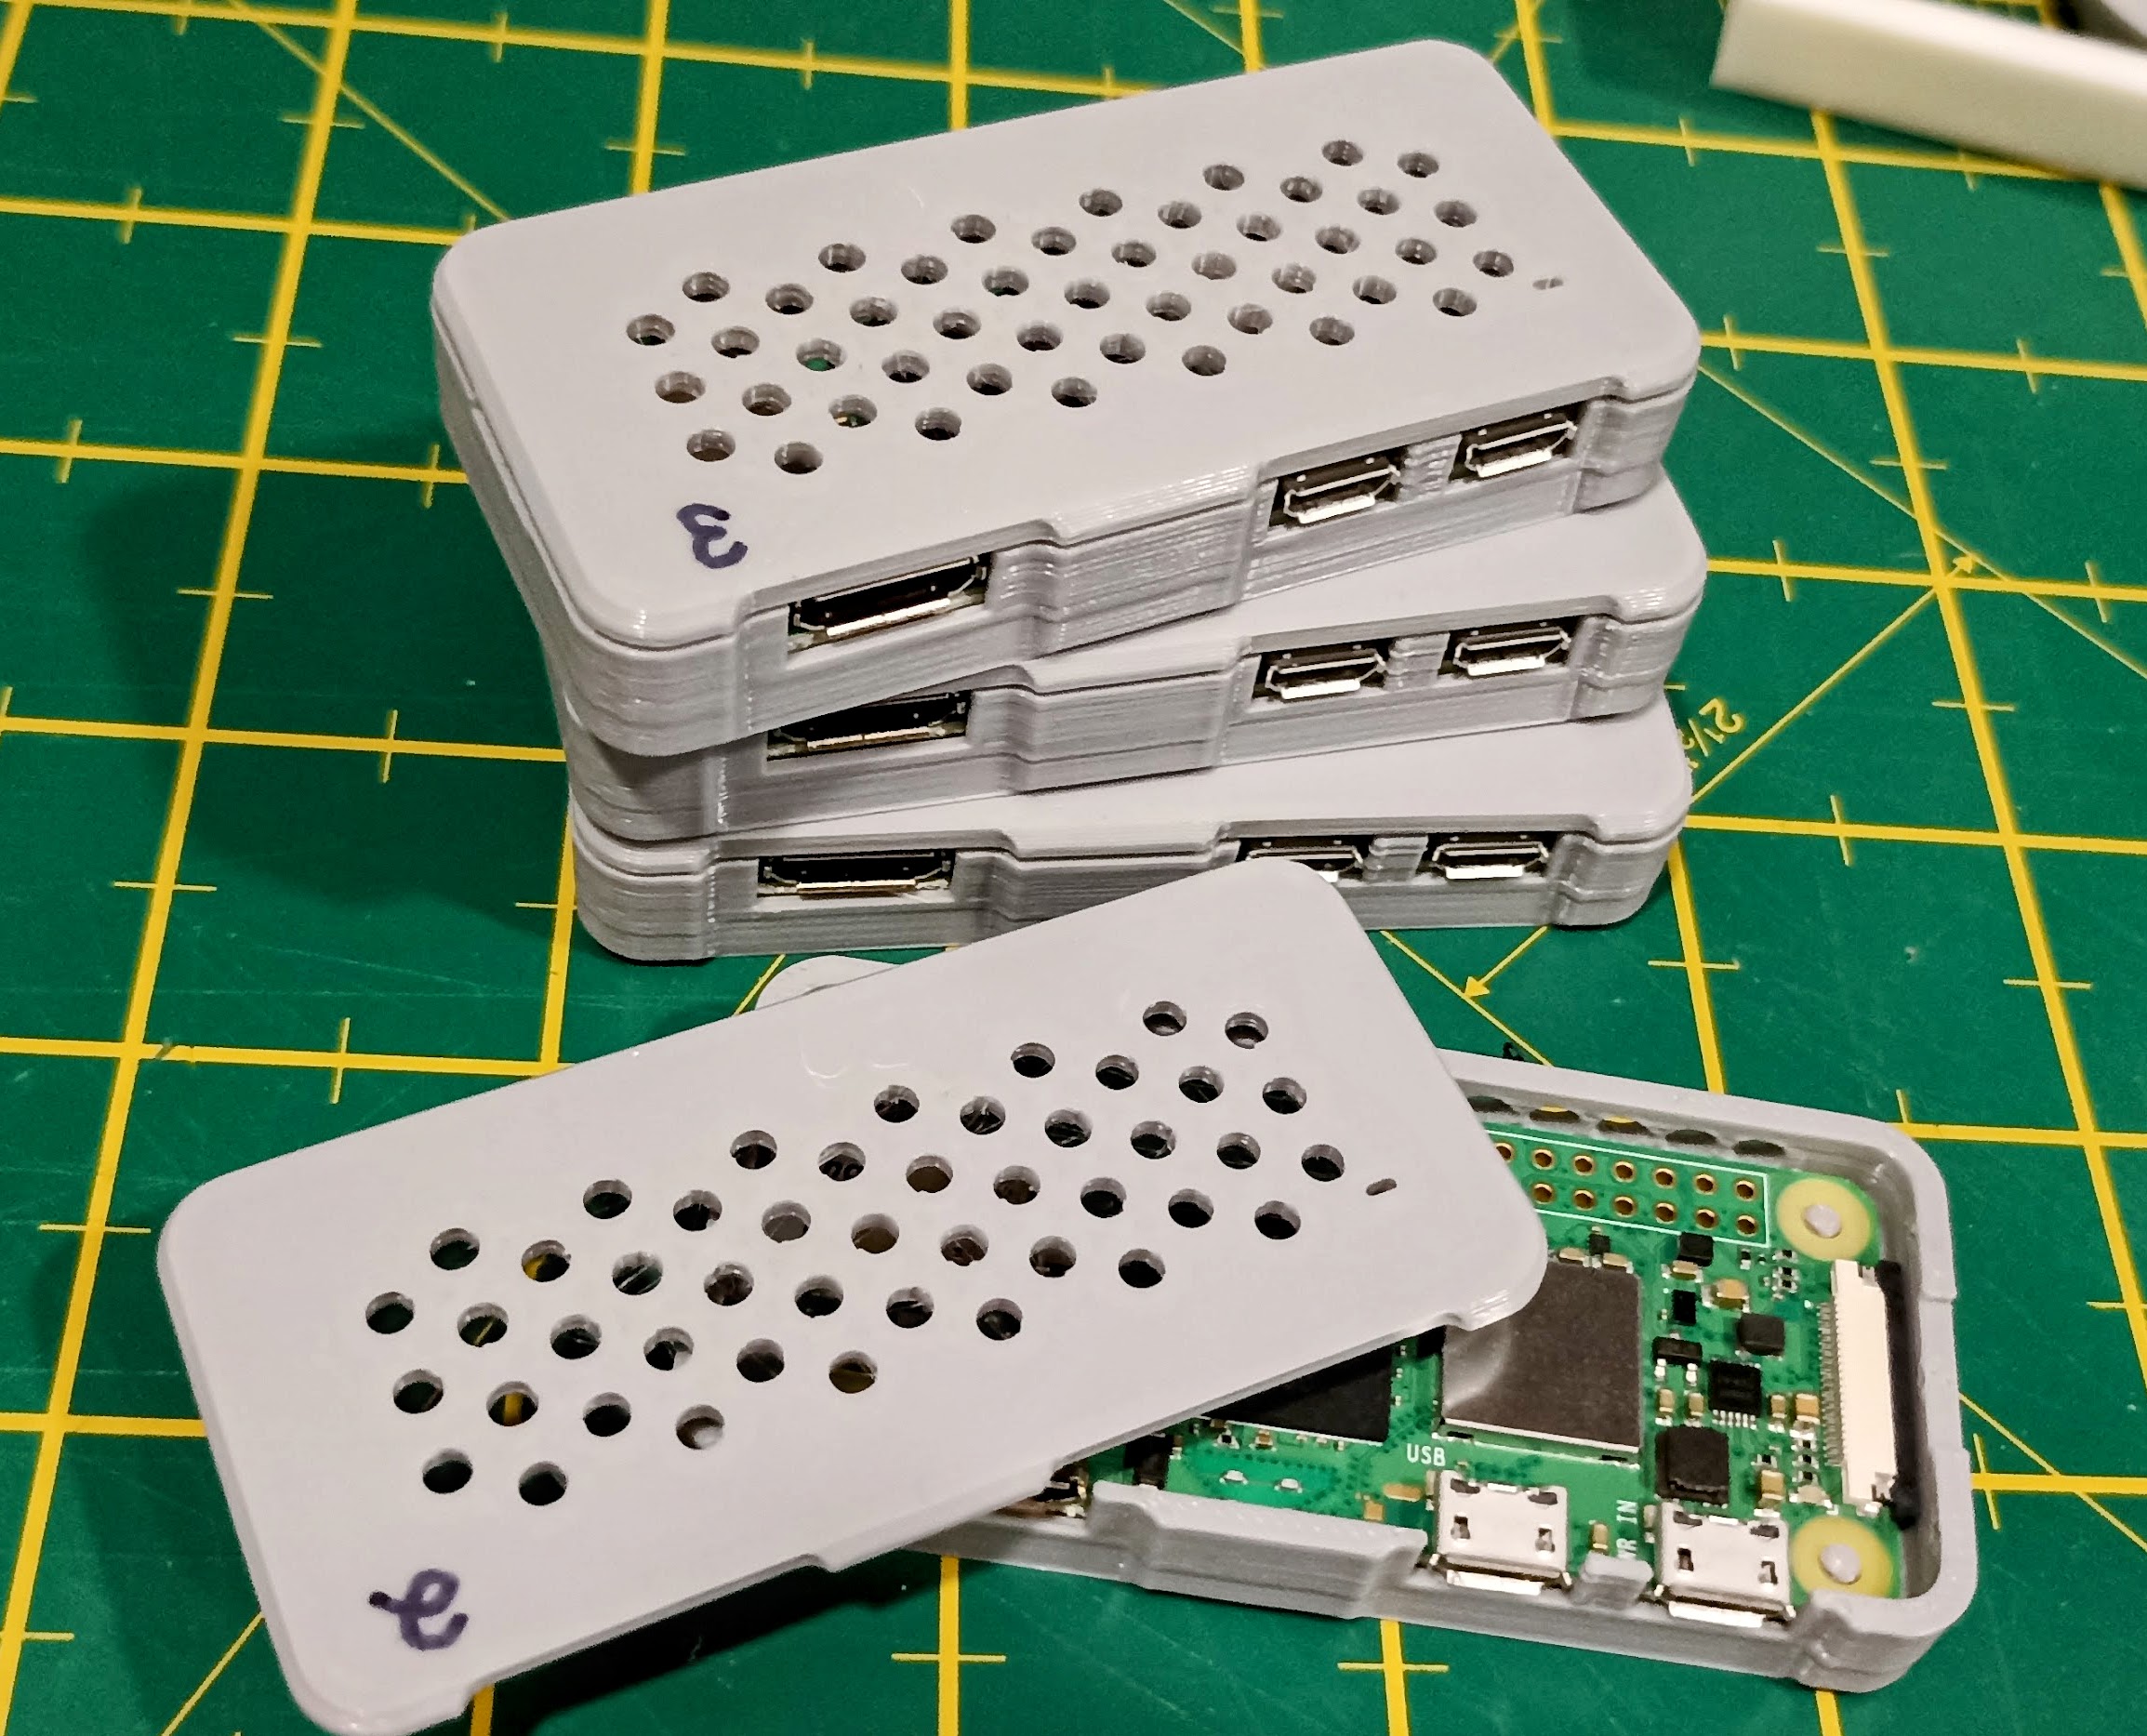
I printed out a bunch of these cases for the Pi Zero’s which kept the SD cards safely in place and gave a little protection to them. The Pi’s were paired with industrial SD cards, as I had some and because they tend to be a little more reliable than the “normal” ones. I also used official Raspberry Pi power supplies because I didn’t want to fight with Raspberry Pi’s browning out.
For setup and on the day maintenance, I carried around one of these little RF keyboards + dongle on a USB OTG cable that works on Pi Zero’s.
Software
With the hardware out of the way it was on to the complicated part of the project, the software.
Frontend
The plan was simple, open a web page on each TV and have those pages subscribe to some kind of event stream thing from the server and then update when the UI when told. If this didn’t work, the fall back was to just refresh the page every few minutes but that seemed a little in-elegant.
HTMX to the rescue and in particular HTMX server-sent-events extension
The SSE extension allowed me to build a simple page and have it subscribe to events on the server and when particular messages were received, swap out <div> tags with the contents of the message. All of this happens transparently and allowed me to build a basic system in a few hours.
In the following snippet of code for the main page:
<div class="scanlines">
    <div class="float">
    </div>

    <div hx-ext="sse" sse-connect="/listen">
        <div id="scoreboard" sse-swap="png-scoreboard">
            <img src="/scoreboardfetch?1" width="100%" height="100%"/>
        </div>
        <div id="message" sse-swap="message">
        </div>
        <div id="display-png" sse-swap="display">
        </div>
        <div id="schedule-container" sse-swap="schedule">
        </div>
    </div>
</div>
You’ll see there is a div that connects to the SSE backend on /listen and then when it receives messages it’ll swap out various of the divs based on the message type.
This page is then decorated with a little CSS to add some fake CRT style scanlines and add some styling to some of the components and you have a nice simple little frontend which can run on the TV’s and they’re all sync’d together.
One of the cool things with HTMX is any <script> tags in the incoming message is immediately executed when its swapped into the DOM which means that you can execute code as well if you need too.
The hardest part of the frontend was figuring out the CSS, it’s definitely not something I’m good at.
Originally I had planned to embed the scoreboard as an <iframe> however I quickly discovered that the PiZero 2 W’s weren’t capable of rendering all the Javascript, CSS etc required for the scoreboard. As a workaround, I had the backend generate a screenshot of the page send that through to the frontend instead. A horrible hack, that worked pretty well and kept the frontend pretty lightweight in the end.
Backend
The backend didn’t have to be particularly complex, I ended up using Python and Flask to build it, mainly because I was able to very quickly get something up and running that would work on a Digital Ocean Ubuntu droplet.
Server Sent Events
Another reason for going with Python & Flask was this incredibly simple implementation of SSE that didn’t require Redis or some other massive dependency. Server-sent events in Flask without extra dependencies • Max Halford
This combined with HTMX allowed me to build a simple publish-subscribe system with minimal code and complexity.
Here is the /listen endpoint as you can see this is almost exactly copied from the above project.
# Event Stream for the frontend
@app.route('/listen', methods=['GET'])
def listen():

    def stream():
        messages = announcer.listen()  # returns a queue.Queue
        while True:
            msg = messages.get()  # blocks until a new message arrives
            yield msg

    return flask.Response(stream(), mimetype='text/event-stream')
Messages can be sent to the frontend with HTML code in them which will get swapped into the appropriate div by message type.
Here is the code to send an image to the frontend.
# Display an image
@app.route('/control/display-image')
def displayimage():
    image = request.args.get('image')
    timeout = request.args.get('timeout', default=60, type=int)

    return displayimage(image, timeout)

def displayimage(imagePath, timeout):
    image_style = f'<style> .display-image {{ top:0; left:0; z-index: 90; position: absolute; background-color: #000000; background-image: url("{imagePath}"); width: 100%; height: 100%; background-repeat: no-repeat; background-size: contain, cover; background-position: center;}} </style>'
    image_msg = '<div id="myImage" class="display-image" width="100%" height="100%"></div>'
    image_script = f'<script>setTimeout(function () {{removeAllChildren(document.getElementById("display-png"))}}, {timeout*1000})</script>'

    msg = format_sse(data=image_style + image_msg + image_script, event='display')
    announcer.announce(msg=msg)
    return {}, 200
You’ll notice that along with some styling for the image there is some javascript included which deletes the image after a set timeout.
Scheduler
For background task scheduling I used APScheduler which allowed me to schedule background tasks to run every few minutes to do things like “Show Sponsor Image” or “Show Speaker Image” or trigger an update of the scoreboard or the session program.
I hacked together a very crude admin page that allowed me to issue a few basic commands like turning a test pattern on/off for all the TV’s or sending a message that would be typed out on the TV’s.
Show Image for Speakers & Sponsors
For the “Show Sponsor Image” and “Show Speaker Image” functions I decided the simplest way would be to throw all the images into folders and then have a background task that incremented an index and use that index to fetch an image from the folders and send it through to the frontend. To keep track of the index, I created a server side cache using Flask Caching to store the last value and then fetched and incremented it using a APScheduler job.
That way all I had to do was send messages to the frontend saying display image at /speakerfetch and all the TV’s would display the same image at the same time.
Here is the task that got called every 10 minutes to show another speaker image.
# Show a Speaker Image
def show_speaker_task():
    speaker_image_idx = cache.get("speaker_image_idx")
    if speaker_image_idx is None:
        speaker_image_idx = 0
    speaker_image_idx += 1
    cache.set("speaker_image_idx", speaker_image_idx)
    displayimage(f'/speakerfetch?{time.time()}', 30)
As you can see this makes use of the above displayimage() function to send the message to the frontend.
This is the code behind the /speakerfetch endpoint.
@app.route('/speakerfetch')
def speakerfetch():
    speaker_image_idx = cache.get("speaker_image_idx")
    speakerFiles = os.listdir('static/speakers/')
    if (speaker_image_idx > len(speakerFiles)):
        cache.set("speaker_image_idx", 0)
    print (f'Fetching Speaker {speaker_image_idx}/{len(speakerFiles)} - {speakerFiles[speaker_image_idx -1]}')
    return send_file(f'static/speakers/{speakerFiles[speaker_image_idx -1]}')
Scoreboard
For the scoreboard I went with a task that triggered chromium-browser in headless mode and grabbed a screenshot, this screenshot was then pushed out to the TV’s every minute or so to update the scoreboard. To illustrate just how resource heavy that scoreboard was I had to up the CPU and RAM to 1GB on the droplet to stop Chromium triggering an Out Of Memory exception.
This task is executed every minute and once finished grabbing a screenshot it calls update_scoreboard() which sends the event to the frontend to update.
# Update scoreboard
def update_scoreboard_task():
    cmd = 'chromium-browser --no-sandbox --headless --disable-gpu --window-size=1920,1080 --timeout=30000 --screenshot=static/scoreboard.png https://2023challenges.bsidescapetown.co.za/scoreboard?fullscreen=1'
    returned_value = subprocess.call(cmd, shell=True)
    update_scoreboard()
Update Scoreboard method
def update_scoreboard():
    message = f'<img src="/scoreboardfetch?{time.time()}" width="100%" height="100%"/>'
    msg = format_sse(data=message, event='png-scoreboard')
    announcer.announce(msg=msg)
    return {}, 200
Talk Schedule - Pretalx
One of the hardest tasks for the backend was figuring out a way to get the schedule of who was speaking when and converting that into something that made sense.
BSides Cape Town was using Pretalx for their submission and talk schedule for the day. I understand that they have an API but at the time I didn’t want to fight with it and authentication, API keys etc. I made the decision to rather just use the frab compatible JSON for the sessions and parsed that to figure out which talks were currently on and what was coming up next, this was then fed into a Flask template and the output HTML was sent to the frontend.
Final wrap-up
A demo video of some of the features.
This insane TV project was started around 20/11/2023 and deployed “to production” at the conference on Saturday 02/12/2023, most of the work being done in the evenings while waiting for code to compile and upload for my talk.
Sure things didn’t run perfectly, the Pi’s crashed, the WiFi went down and occasionally things just needed to be power-cycled but it worked!
There is no way I could’ve built this, in the time I did without HTMX and Flask and all the associated stuff.
