A companion blog post that covers everything that was in my Smart Watch Lobotomy talk and everything that couldn’t make it into the talk.
You’ll find a lot more information on the watch, BLE hacking, SWS and firmware.
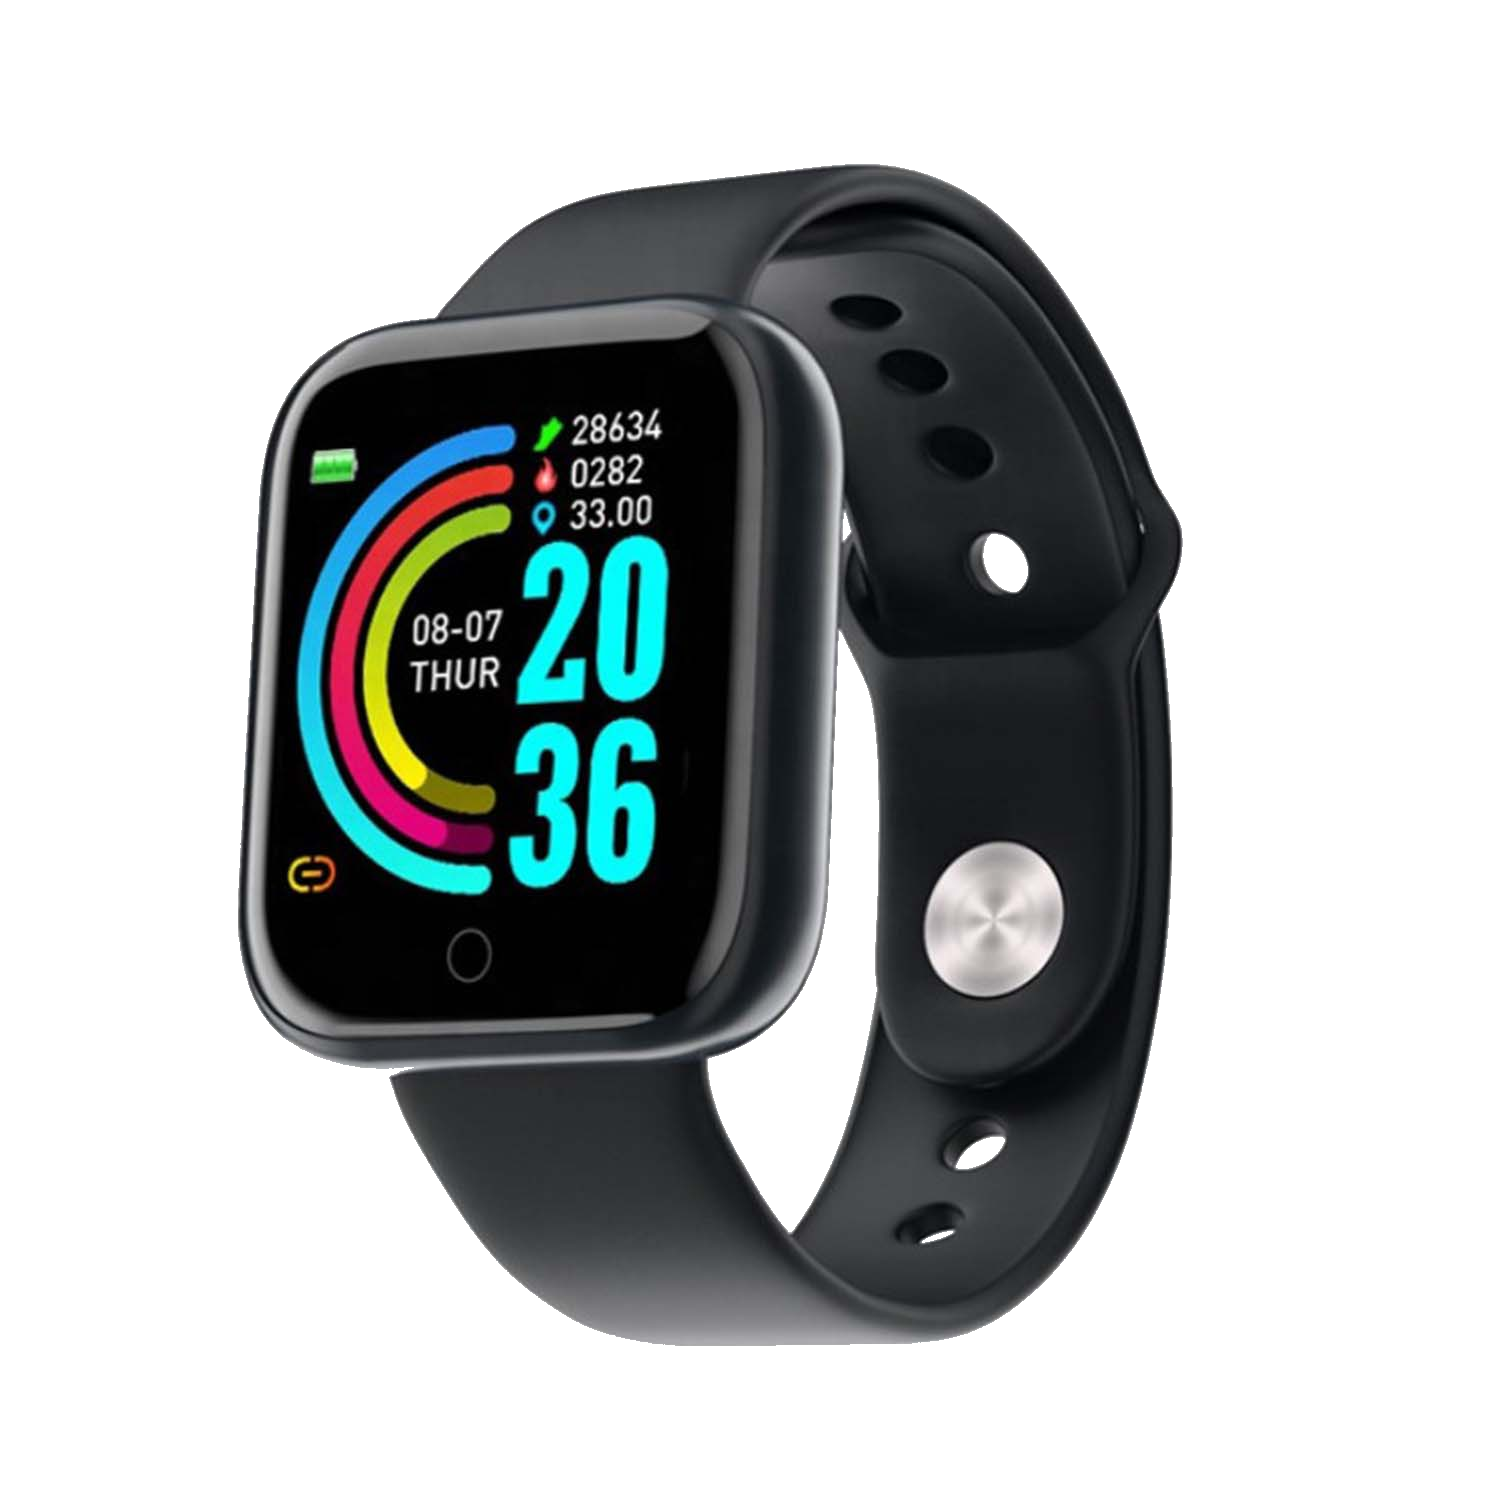
The Watch
The watch I’m using is the FocusFit Pro-Y68 available at Takealot for between R100 - R200 (or 2 - 4 McDonalds BigMac’s)
However you’ll see if you search on Takealot for Y68 that there are a bunch of other watches with similar features.
Specifications:
| Claimed | Actual | |
|---|---|---|
| Screen size | 1.3inch IPS colour screen | ✅ |
| Waterproof grade | IP67 waterproof | ❌ Nope |
| Chipset | HS6620D | TLSR8323 |
| Battery capacity | 150mAh Li-polymer | ❌ 100mAh / 150mAh |
| Heart rate detection | manual/automatic detection | ❌ |
| Standby time | 10 days | ❌ 1 hour - 3 days |
| Charging time | 2 hours | ✅ |
Watch Serial No and Software Version
In the info/shutdown screen of the watch you’ll find all of the following information.

- Watch Model:
LT716(G) - Software Version:
V03767 - Bluetooth Device Name:
LT716 - Bluetooth MAC Address:
FF104892- The last portion of the Bluetooth MAC Address, in this particular watches case the full MAC address isFF:FF:FF:10:48:92 - Unknown:
11291422not been able so far to decode this last string of values on the watch.
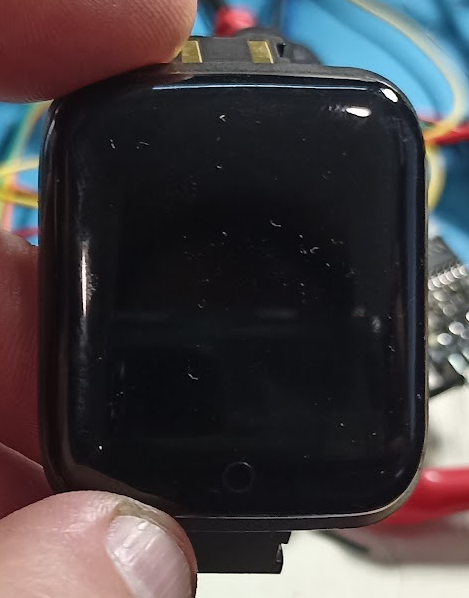
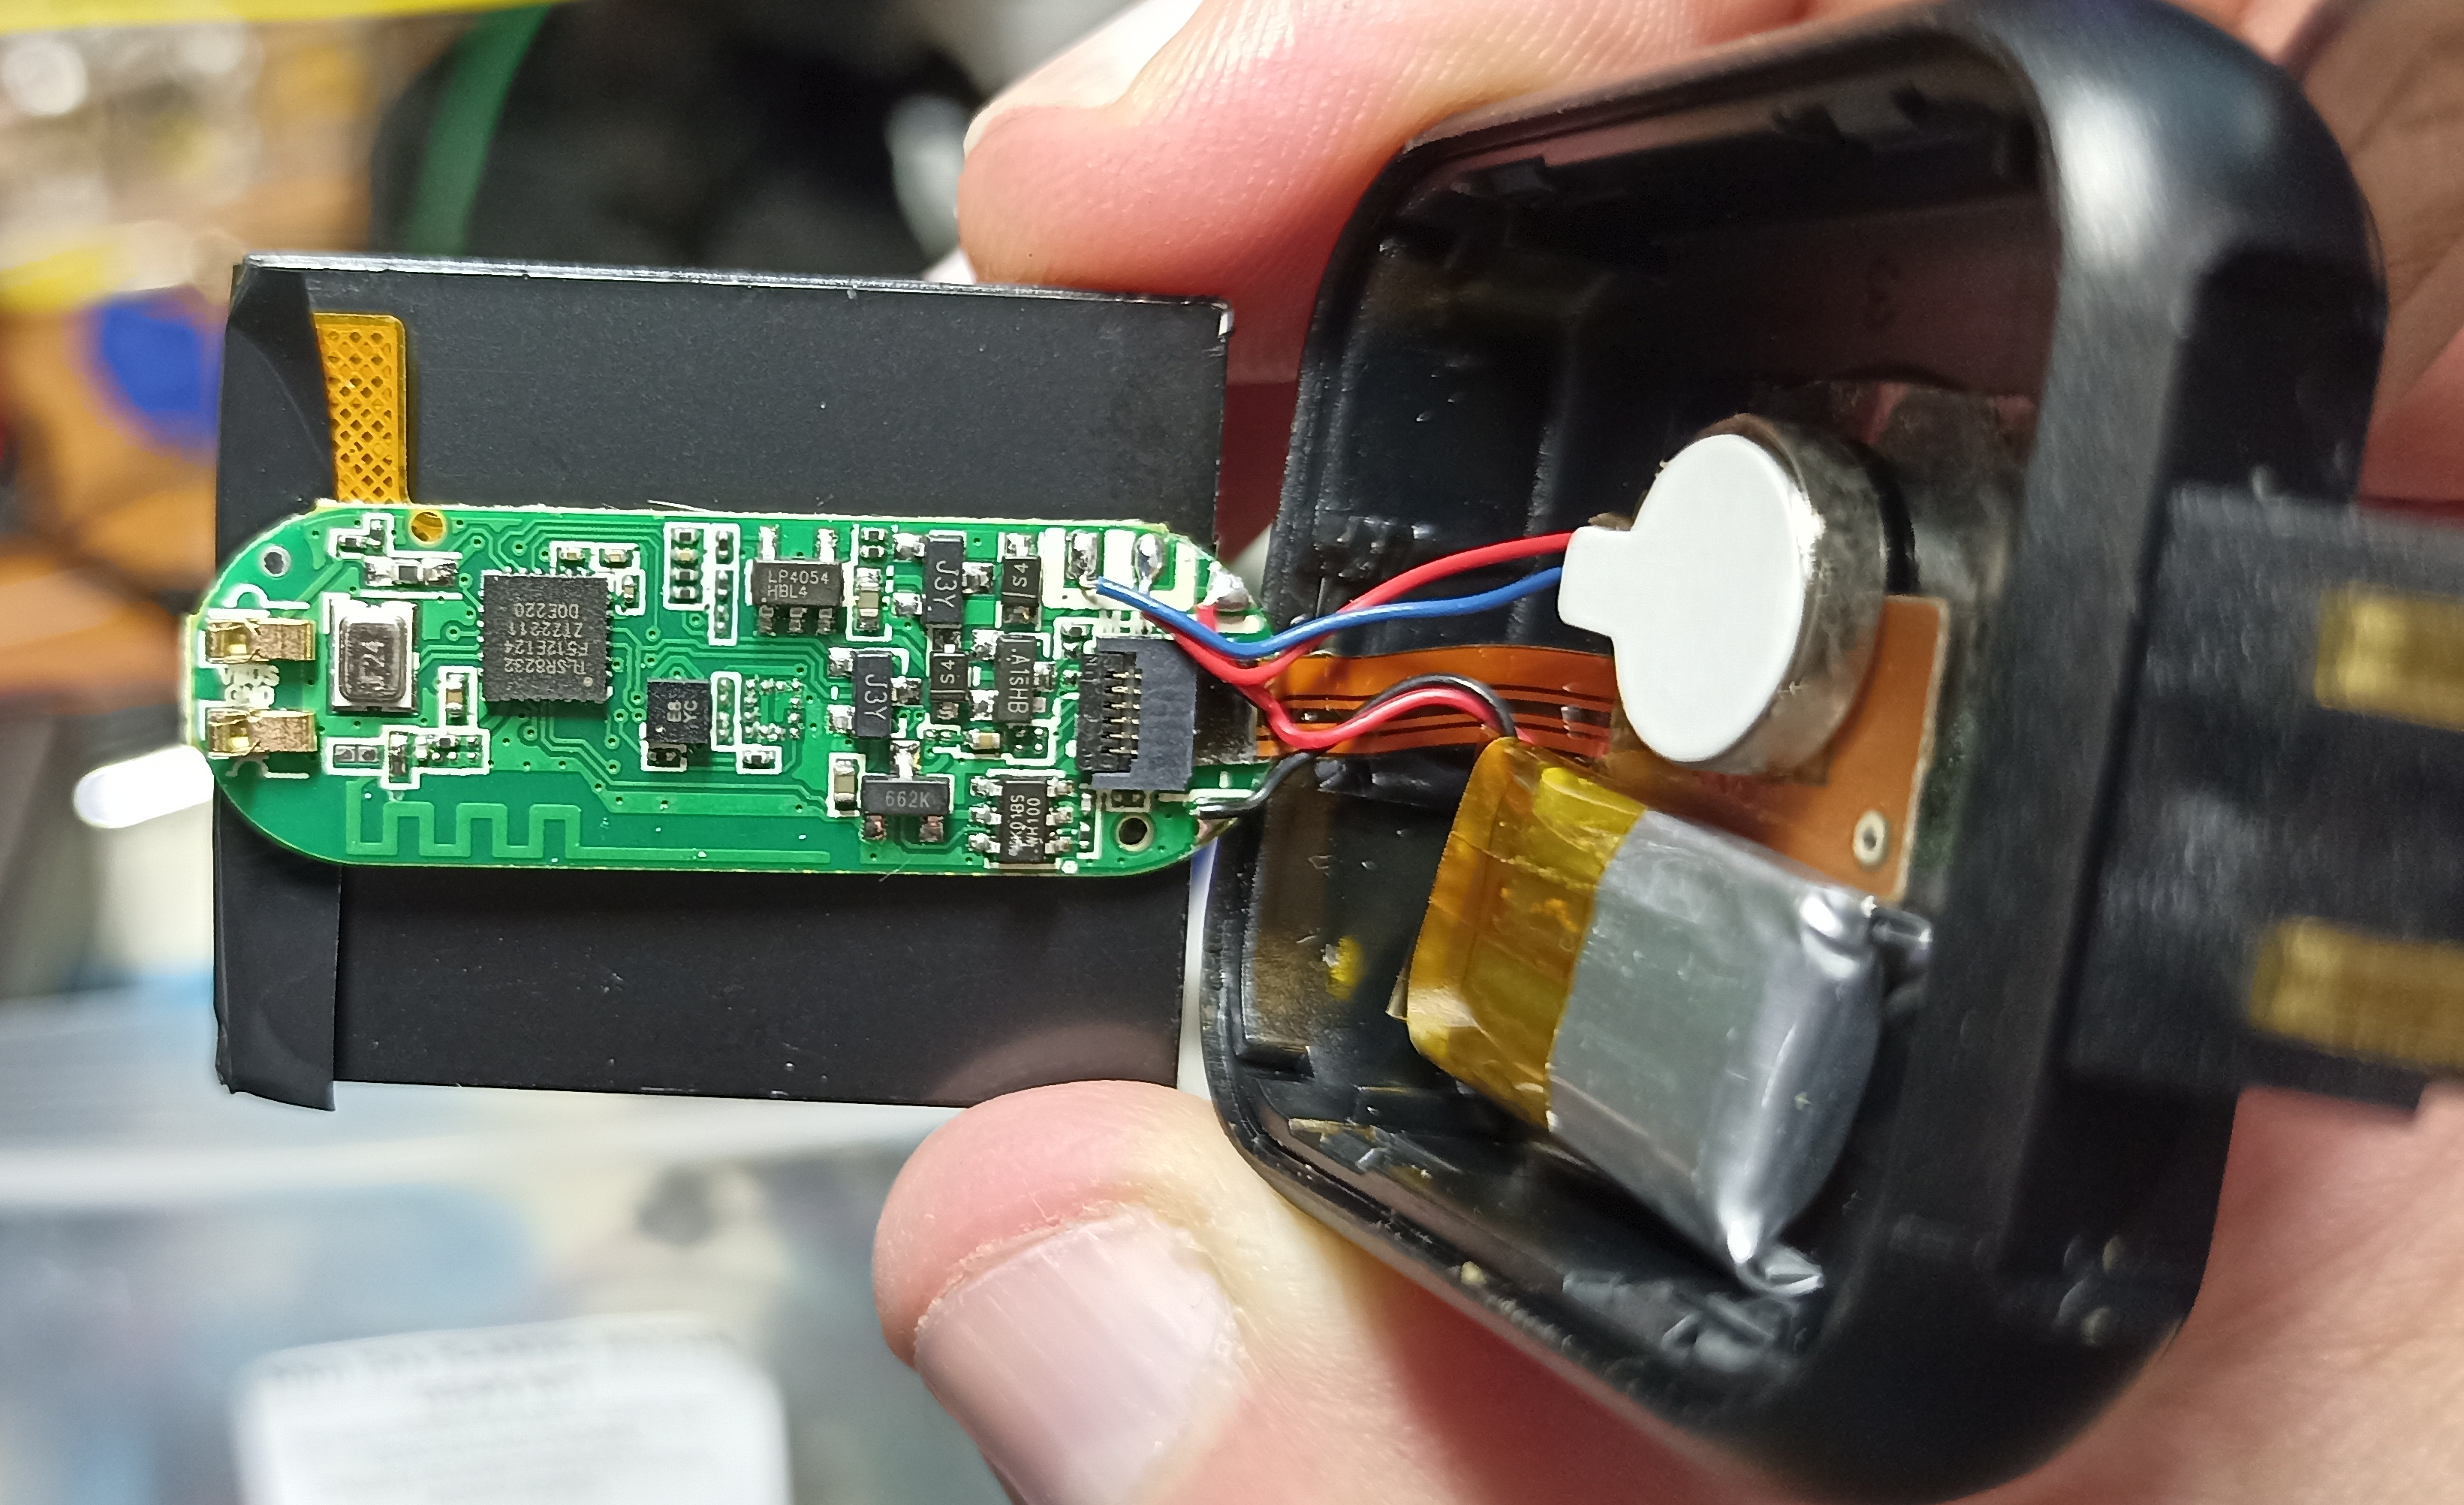
The Hardware
The outside of the watch.
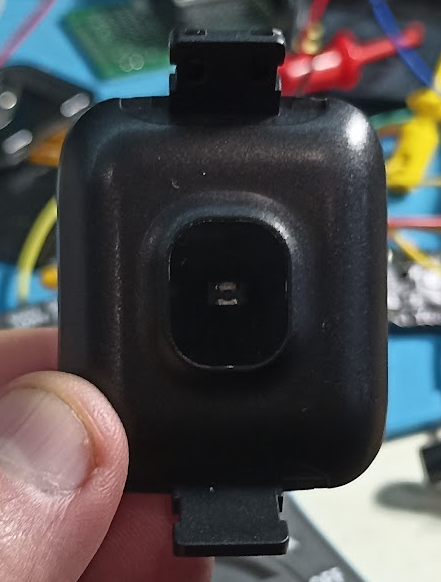
The Front plastic cover is easily popped off to reveal internals
Model No appears to be LT716 (based on what is in the Settings screen and on the PCB)
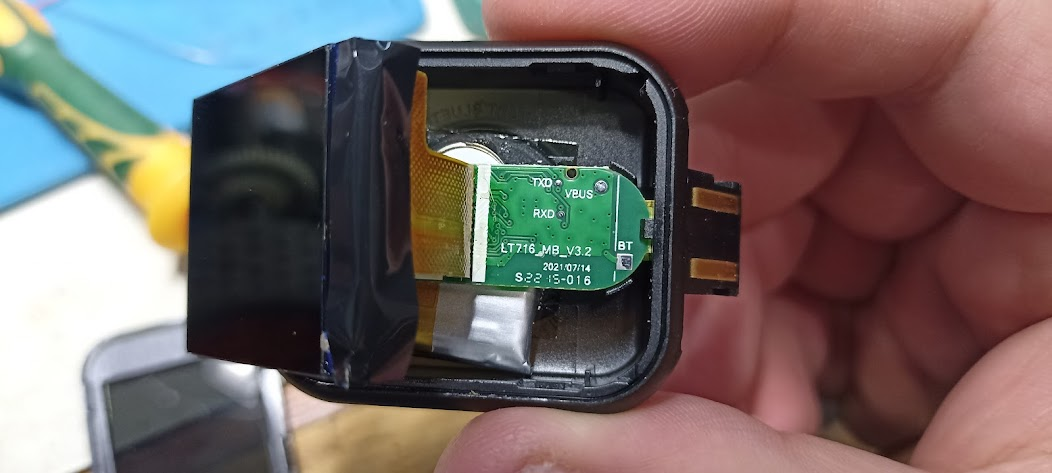
PCB Test Points
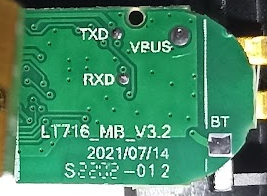
- LT716_MB_V3.2 2021/07/14
- TXD - Serial TX?
- RXD - Serial RX?
- BT - Bluetooth (Antenna)
- VBUS - USB VBus Voltage
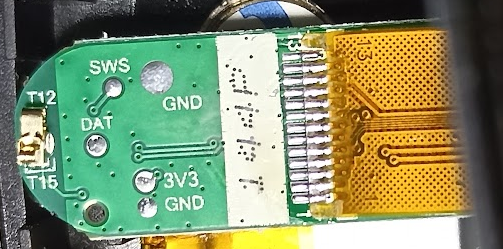
- T12 / T15 - Touch button for display
- GND - Ground
- 3V3 - 3.3v +
- DAT - Data?
- SWS - Debug Interface
Other side of the board
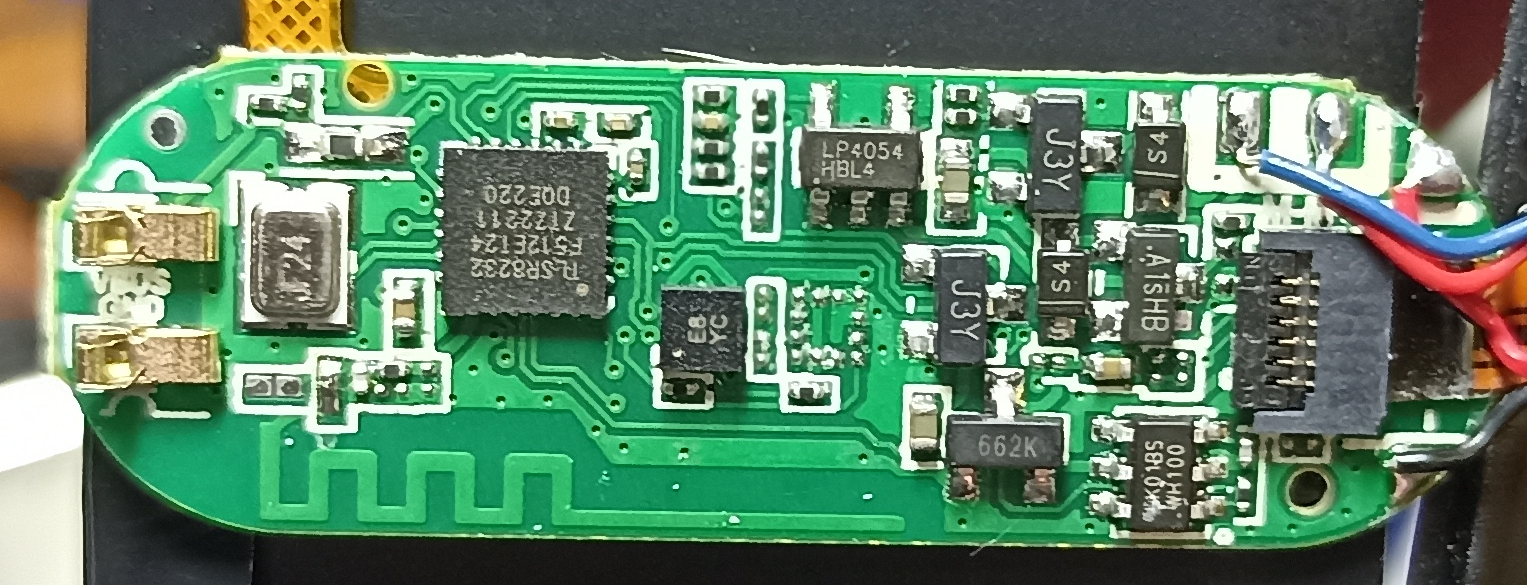
Details of the SoC and other components:
LCD Screen Details:

Components
PCB
- The SoC is a Telink’s TLSR8232 - Datasheet
- LP4054 - 500mA Standalone Linear Li-Ion Battery Charger IC Datasheet
- J3Y - NPN SMD Transistor
- A1SHB - P-Channel Trench Power MOSFET
- 662K - 3.3V 200mA Positive Fixed LDO Voltage Regulator *2 HK01BS - single-channel capacitive touch chip - Some details (requires translation) Guessed this one as I couldn’t easily make out the H in front
- E8 YC - Accelerometer ??? Something like a KX022-1020
- 25MHz Crystal
Display
- 1.44" unknown display. Has the markings YS-1.44-13P on it but not sure what that means. I think the 1.44 in the markings mean 1.44" and the 13P means 13pin interface.
Guessing the display is 240x240 or perhaps 128x128 in size? Popular controllers are ST7789 (up to 320x240) Datasheet and the ST7735S (up to 132x162) Datasheet
Heart Rate Sensor
Originally I assumed it had some kind of small heart rate sensor like a PAH8002 mounted on the flex PCB.
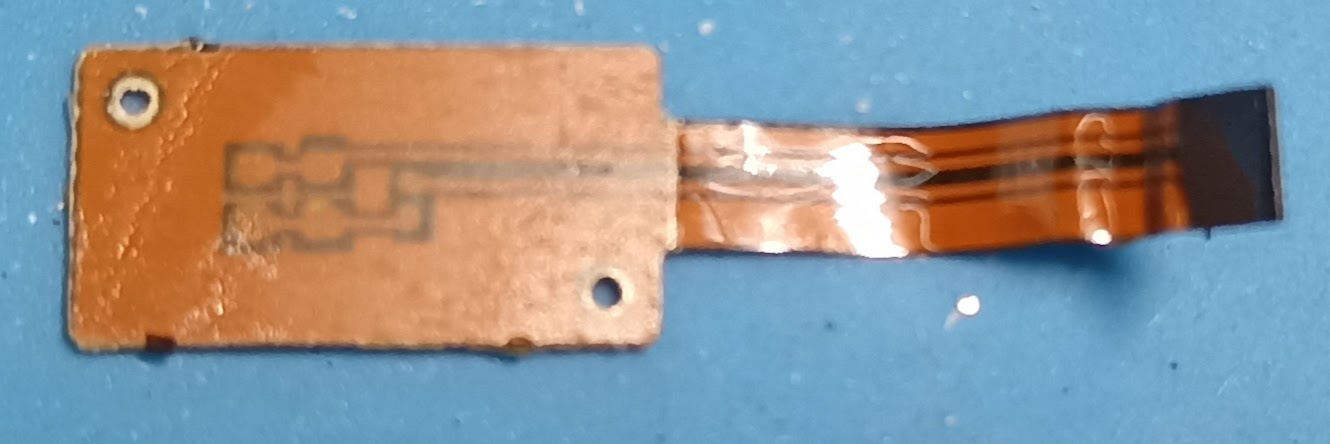
However after removing the flex PCB it became very obvious that it contained a fake heart rate sensor, which explains some of the crazy values I got when playing with the watch.
I’m guessing that perhaps there is a more expensive version of this hardware that comes with an actual sensor as it appears the hardware could support it and there may actually be enough pins etc to do it.
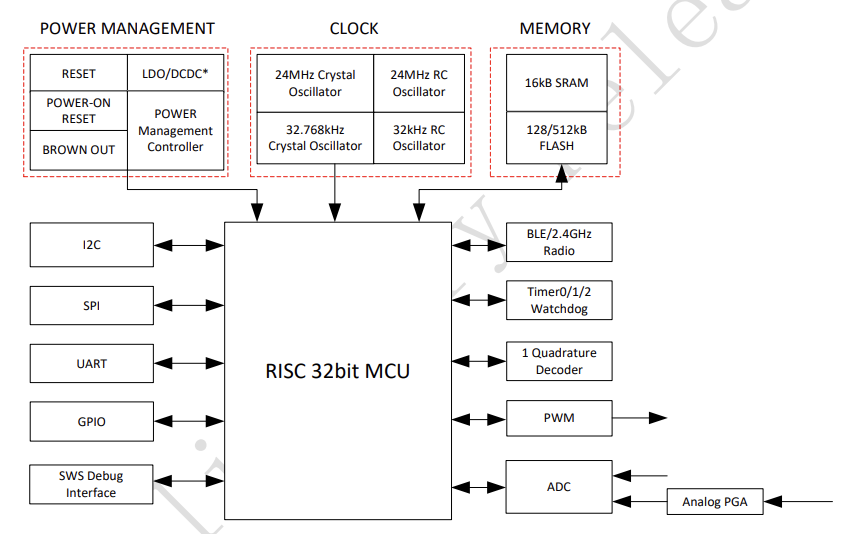
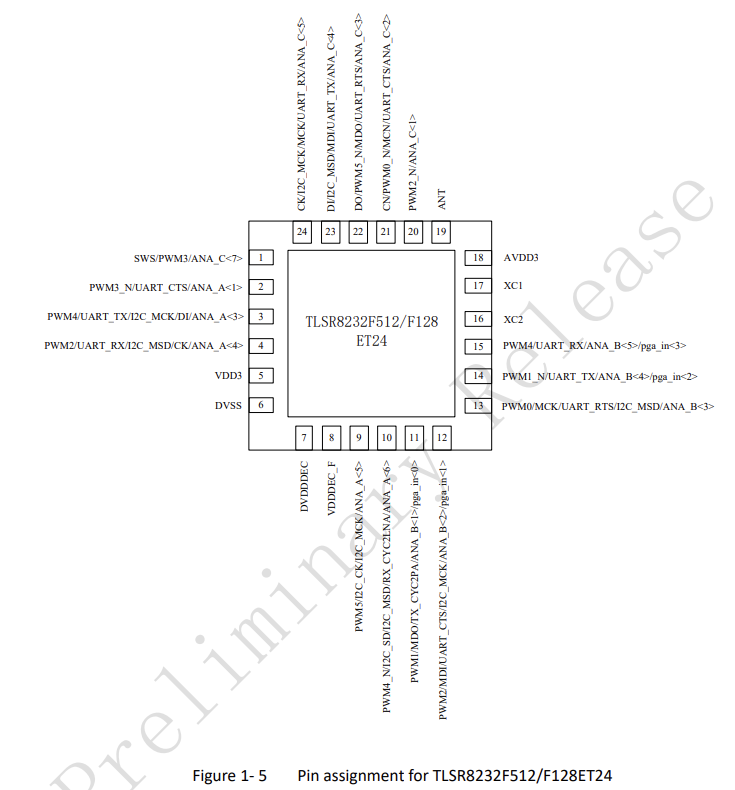
Telink TLSR8232 Bluetooth SoC
The SoC is a Telink’s TLSR8232 - Datasheet This appears to be a commonly used cheap bluetooth SoC often used as a replacement to the similar chips from Nordic and TI.
- Part No:
TLSR8232F512ET24 - SRAM:
16KB - Flash:
512KB - Bluetooth Protocol:
Up to and including Bluetooth LE 5.0 (non-Audio) - Package Size:
QFN 4x4, 24 pins
From the website:
The TLSR823x series integrates a power-balanced 32-bit proprietary MCU,
a high-performance Bluetooth® LE/2.4GHz Radio, SRAM, embedded flash or OTP,
a general-purpose ADC, a quadrature decoder (QDEC), PWM,
flexible I/O interfaces and other peripheral blocks required for
Bluetooth® Low Energy application development.
The TLSR8232 integrates a power-balanced 32-bit proprietary MCU, a high-performance BLE/2.4GHz Radio, 16kB SRAM, a 512kB/128kB flash, a general-purpose ADC, a quadrature decoder (QDEC), 6-channel PWM, flexible I/O interfaces and other peripheral blocks required for Bluetooth Low Energy application development.
TLSR8232 Programmer
The TLSR8232 uses a proprietary programming interface called SWire/SWS (Single Wire Slave), although there are official programmers available for it they’re not cheap and not easily accessible.
Some searching showed these projects to implement the programmer using a “blue pill” dev board and even USB to Serial adapters.
- pvvx/TlsrTools: Alternative programmer for TLSR8269
- pvvx/TlsrComSwireWriter: TLSR826x/825x COM port Swire Writer
- pvvx/TlsrComProg: TLSR826x programmer via COM port
Unfortunately none of these worked initially due to some quirks with the way the watch is designed and the chip that was used.
The SWS protocol requires 3 signals to function.
- SWS
- GND - Ground
- RST (Optional) - Reset
The problem is the 24pin version of the TLSR8232 used in this watch does not have a reset pin. The reset pin is required to hold the chip in reset and then let it come out as you continually hit the SWS pin so that the chip does not execute your code but rather drops in programming/debugging mode.
The lack of a reset pin wouldn’t have been a problem, however the SWS line is used for the heart rate sensor so seems to be switched from SWS to GPIO early on in the startup of the watch.
BLE - Bluetooth Low Energy
📝Note: For what I assume are power saving reasons these watches are terrible at bluetooth. Often they’ll not show up on scans for the device or not respond to commands etc.
Waiting a few seconds or going through a few menu options on the device to “wake it up” seems to get it responding again.
The official app solves this with a combination of caching and queueing of commands, obviously most tools for probing BLE devices are not built this way.
Finding the watches MAC Address
Under Linux and other OSes that use hcitool this is relatively simple and can be done by running the following commands.
chippy@fire:~/src/smart-watch/lt716-ble$ sudo hcitool lescan
LE Scan ...
A4:C1:38:4F:42:F1 LYWSD03MMC
A4:C1:38:83:B5:A6 LYWSD03MMC
FF:FF:FF:10:48:92 LT716
On Android there is a fantastic app for playing with BLE called NRF Connect (I believe it’s also available on iOS) made by Nordic Semiconductor which was originally built for their nrf* line of BLE SoC’s however will work with most BLE implementations (YAY Standards). In my experience it has been the easiest and most reliable method to explore BLE on these devices.
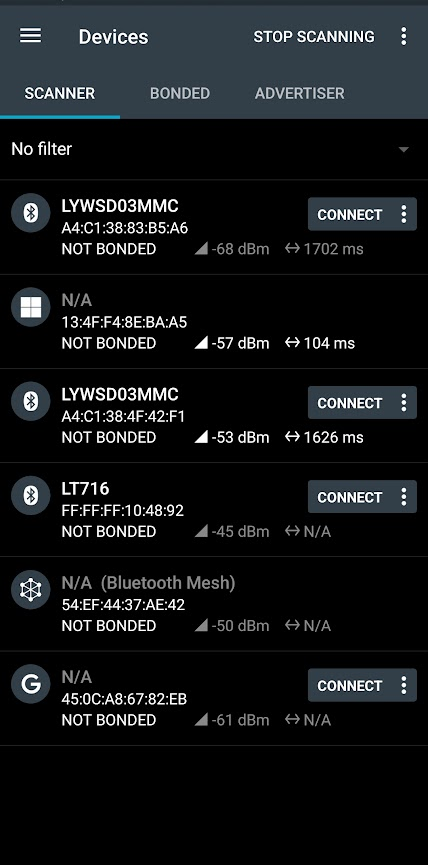
The entry FF:FF:FF:10:48:92 LT716 is the watch that I’m currently playing with, you can confirm this by going to the Watch Serial No and Software Version menu on the watch and comparing it to what is displayed there.
Scanning and probing interesting services
📝Note: None of this scanning etc requires that anything actually pair with the device or that any authentication is required to perform these steps with the watch.
All of this is possible using a tool like gatttool on the command line but NRF Connect just displays the information in a much nicer way and also adds additional information like standard Service Definition entries etc.
Here is a list of services provided by the watch in the NRF Connect app.
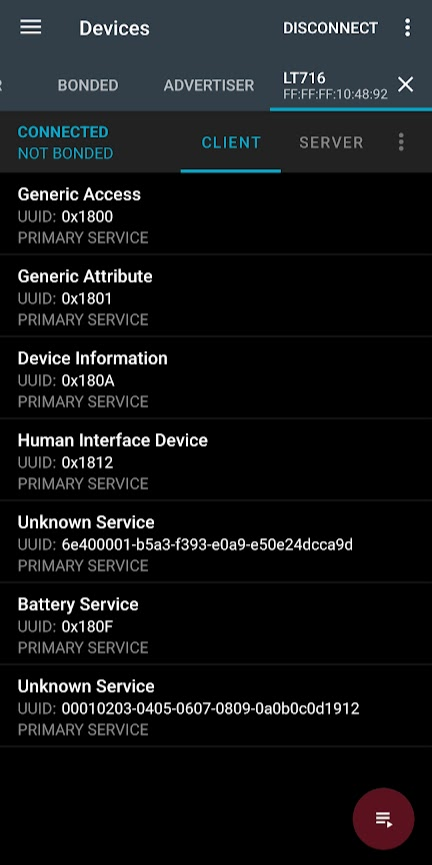
Here is the same list fetched using gatttool on Linux.
chippy@fire:~/src/smart-watch/lt716-ble$ gatttool --device=FF:FF:FF:10:48:92 --primary
attr handle = 0x0001, end grp handle = 0x0007 uuid: 00001800-0000-1000-8000-00805f9b34fb
attr handle = 0x0008, end grp handle = 0x000b uuid: 00001801-0000-1000-8000-00805f9b34fb
attr handle = 0x000c, end grp handle = 0x0012 uuid: 0000180a-0000-1000-8000-00805f9b34fb
attr handle = 0x0013, end grp handle = 0x002d uuid: 00001812-0000-1000-8000-00805f9b34fb
attr handle = 0x002e, end grp handle = 0x0033 uuid: 6e400001-b5a3-f393-e0a9-e50e24dcca9d
attr handle = 0x0034, end grp handle = 0x0037 uuid: 0000180f-0000-1000-8000-00805f9b34fb
attr handle = 0x0038, end grp handle = 0x003b uuid: 00010203-0405-0607-0809-0a0b0c0d1912
You need to combine it with this info
chippy@fire:~/src/smart-watch/lt716-ble$ gatttool --device=FF:FF:FF:10:48:92 --char-desc
handle = 0x0001, uuid = 00002800-0000-1000-8000-00805f9b34fb
handle = 0x0002, uuid = 00002803-0000-1000-8000-00805f9b34fb
handle = 0x0003, uuid = 00002a00-0000-1000-8000-00805f9b34fb
handle = 0x0004, uuid = 00002803-0000-1000-8000-00805f9b34fb
handle = 0x0005, uuid = 00002a01-0000-1000-8000-00805f9b34fb
handle = 0x0006, uuid = 00002803-0000-1000-8000-00805f9b34fb
handle = 0x0007, uuid = 00002a04-0000-1000-8000-00805f9b34fb
handle = 0x0008, uuid = 00002800-0000-1000-8000-00805f9b34fb
handle = 0x0009, uuid = 00002803-0000-1000-8000-00805f9b34fb
handle = 0x000a, uuid = 00002a05-0000-1000-8000-00805f9b34fb
handle = 0x000b, uuid = 00002902-0000-1000-8000-00805f9b34fb
handle = 0x000c, uuid = 00002800-0000-1000-8000-00805f9b34fb
handle = 0x000d, uuid = 00002803-0000-1000-8000-00805f9b34fb
handle = 0x000e, uuid = 00002a50-0000-1000-8000-00805f9b34fb
handle = 0x000f, uuid = 00002803-0000-1000-8000-00805f9b34fb
handle = 0x0010, uuid = 00002a26-0000-1000-8000-00805f9b34fb
handle = 0x0011, uuid = 00002803-0000-1000-8000-00805f9b34fb
handle = 0x0012, uuid = 00002a28-0000-1000-8000-00805f9b34fb
handle = 0x0013, uuid = 00002800-0000-1000-8000-00805f9b34fb
handle = 0x0014, uuid = 00002802-0000-1000-8000-00805f9b34fb
handle = 0x0015, uuid = 00002803-0000-1000-8000-00805f9b34fb
handle = 0x0016, uuid = 00002a4e-0000-1000-8000-00805f9b34fb
handle = 0x0017, uuid = 00002803-0000-1000-8000-00805f9b34fb
handle = 0x0018, uuid = 00002a22-0000-1000-8000-00805f9b34fb
handle = 0x0019, uuid = 00002902-0000-1000-8000-00805f9b34fb
handle = 0x001a, uuid = 00002803-0000-1000-8000-00805f9b34fb
handle = 0x001b, uuid = 00002a32-0000-1000-8000-00805f9b34fb
handle = 0x001c, uuid = 00002803-0000-1000-8000-00805f9b34fb
handle = 0x001d, uuid = 00002a4d-0000-1000-8000-00805f9b34fb
handle = 0x001e, uuid = 00002902-0000-1000-8000-00805f9b34fb
handle = 0x001f, uuid = 00002908-0000-1000-8000-00805f9b34fb
handle = 0x0020, uuid = 00002803-0000-1000-8000-00805f9b34fb
handle = 0x0021, uuid = 00002a4d-0000-1000-8000-00805f9b34fb
handle = 0x0022, uuid = 00002902-0000-1000-8000-00805f9b34fb
handle = 0x0023, uuid = 00002908-0000-1000-8000-00805f9b34fb
handle = 0x0024, uuid = 00002803-0000-1000-8000-00805f9b34fb
handle = 0x0025, uuid = 00002a4d-0000-1000-8000-00805f9b34fb
handle = 0x0026, uuid = 00002908-0000-1000-8000-00805f9b34fb
handle = 0x0027, uuid = 00002803-0000-1000-8000-00805f9b34fb
handle = 0x0028, uuid = 00002a4b-0000-1000-8000-00805f9b34fb
handle = 0x0029, uuid = 00002907-0000-1000-8000-00805f9b34fb
handle = 0x002a, uuid = 00002803-0000-1000-8000-00805f9b34fb
handle = 0x002b, uuid = 00002a4a-0000-1000-8000-00805f9b34fb
handle = 0x002c, uuid = 00002803-0000-1000-8000-00805f9b34fb
handle = 0x002d, uuid = 00002a4c-0000-1000-8000-00805f9b34fb
handle = 0x002e, uuid = 00002800-0000-1000-8000-00805f9b34fb
handle = 0x002f, uuid = 00002803-0000-1000-8000-00805f9b34fb
handle = 0x0030, uuid = 6e400003-b5a3-f393-e0a9-e50e24dcca9d
handle = 0x0031, uuid = 00002902-0000-1000-8000-00805f9b34fb
handle = 0x0032, uuid = 00002803-0000-1000-8000-00805f9b34fb
handle = 0x0033, uuid = 6e400002-b5a3-f393-e0a9-e50e24dcca9d
handle = 0x0034, uuid = 00002800-0000-1000-8000-00805f9b34fb
handle = 0x0035, uuid = 00002803-0000-1000-8000-00805f9b34fb
handle = 0x0036, uuid = 00002a19-0000-1000-8000-00805f9b34fb
handle = 0x0037, uuid = 00002902-0000-1000-8000-00805f9b34fb
handle = 0x0038, uuid = 00002800-0000-1000-8000-00805f9b34fb
handle = 0x0039, uuid = 00002803-0000-1000-8000-00805f9b34fb
handle = 0x003a, uuid = 00010203-0405-0607-0809-0a0b0c0d2b12
handle = 0x003b, uuid = 00002901-0000-1000-8000-00805f9b34fb
Placing the above entries by handle the attr handle and end grp handle entries.
So for example to find the Firmware Revision entry (0x2A26) is handle = 0x0010, uuid = 00002a26-0000-1000-8000-00805f9b34fb which you can then find the associated service attr handle = 0x000c, end grp handle = 0x0012 uuid: 0000180a-0000-1000-8000-00805f9b34fb as 0x0010 falls between 0x000c and 0x0012
It’s essentially the same info, however obviously the NRF connect app presents the information much more nicely.
Let’s look at two of these services in further detail. I’ll use a combination of the NRF Connect application and the gatttool showing two different methods of fetching the same information for each of these services.
Device Information (0x180A)
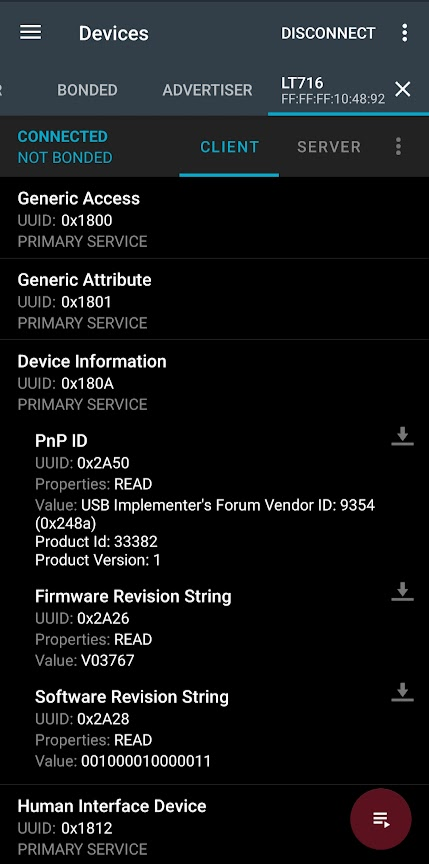
To get the same info via the gatttool we can do the following
chippy@fire:~/src/smart-watch/lt716-ble$ gatttool --device=FF:FF:FF:10:48:92 --char-read --uuid=0x2a26
handle: 0x0010   value: 56 30 33 37 36 37
Converting that value (which is in hex) to a string you get the following.
Python 3.9.7 (tags/v3.9.7:1016ef3, Aug 30 2021, 20:19:38) [MSC v.1929 64 bit (AMD64)] on win32
Type "help", "copyright", "credits" or "license" for more information.
>>> bytearray.fromhex("56 30 33 37 36 37").decode(encoding='ascii')
'V03767'
>>>
Battery Service (0x180f)
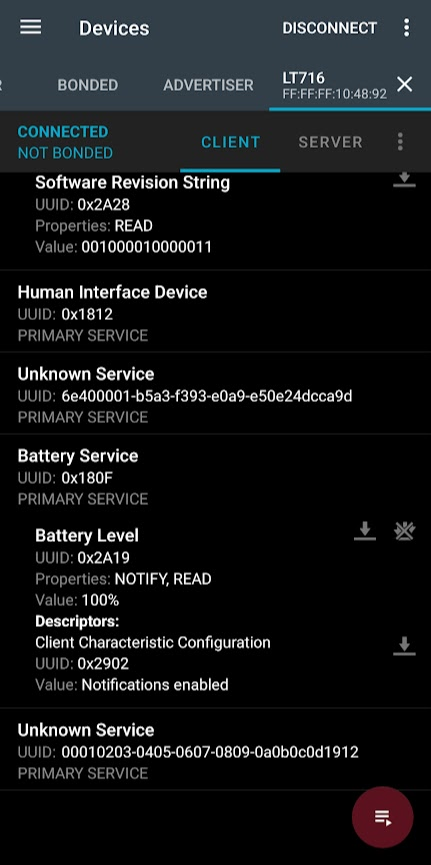
To get the same info via the gatttool we can do the following
chippy@fire:~/src/smart-watch/lt716-ble$ gatttool --device=FF:FF:FF:10:48:92 --char-read --uuid=0x2a19
handle: 0x0036   value: 64
Converting that to an int gets us the percentage of the battery.
>>> int('64', 16)
100
Android Software
Reverse Engineering the Android APK
The official FitPro App is available on the Google Play Store although I grabbed a copy of the APK on APKPure as that was the first place I could just grab the APK from, I doubt there are too many differences between the various versions available.
The APK I’m using below is fitpro_2.0.7_Apkpure.APK
I’m using jadx to do the de-compiling.
For those who haven’t done it, de-compiling has come a long way and the code that comes out of jadx is very readable. Yes there are ways to make this harder, but it’s a cheap watch so not really worth it for them to do it.
How “🔍Find my device” works
Below is the code that runs when you tap the “Find” button, as you can see it builds a command of some kind using SendData.getSetFindMeValue(true) and then sends that command to the bluetooth service (mService.commandPoolWrite())
Ultimately what we’re looking for is what is the actual command (bytes) we’re sending to which BLE UUID
From xfkj.fitpro.fragment.DeviceFragmentNew
@OnClick({R.id.card_find})
public void onMCardFindClicked() {
	if (Constant.BleState != 1) {
		Toast.makeText(this.mContext, getString(R.string.unconnected), 0).show();
		return;
	}
	Toast.makeText(this.mContext, getString(R.string.find_device_txt), 0).show();
	Constant.mService.commandPoolWrite(SendData.getSetFindMeValue(true), "寻找手环");
}
The following two sections of code are what build up the command byte array based on whether you set it to true or false
from xfkj.fitpro.bluetooth.SendData
public static byte[] getSetFindMeValue(boolean z) {
	return SwitchProtocol((byte) 18, (byte) 11, z ? (byte) 1 : (byte) 0);
}
public static byte[] SwitchProtocol(byte b, byte b2, byte b3) {
	return new byte[]{-51, 0, 6, b, 1, b2, 0, 1, b3};
}
The final command to send to turn on Find is
byte[]{-51, 0, 6, 18, 1, 11, 0, 1, 1};
Now we just have to work out where this gets sent, looking at the following method we can see its writing to a particular GATT Characteristic.
from xfkj.fitpro.service.LeService
public void commandPoolWrite(byte[] bArr, String str) {
	if (WatchThemeTools.getInstance().isUpgrade() || Constant.otaState > 0) {
		Log.e(this.TAG, "upgradding clock dial or ota");
	} else if (this.mBluetoothAdapter == null || this.mBluetoothGatt == null) {
		MyApplication.Logdebug(this.TAG, "commandPoolWrite mBluetoothAdapter is null or mBluetoothGatt is null");
		Constant.BleState = 0;
		close();
	} else if (!getBluetoothGattWriteCharacteristic()) {
		MyApplication.Logdebug(this.TAG, "commandPoolWrite not hasWriteChar");
		Constant.mService.close();
		Constant.BleState = 0;
	} else {
		this.mCommandPool.addCommand(CommandPool.Type.write, bArr, this.writeChar, str);
	}
}
From the above code we can see that it’s adding some kind of command to a pool to be sent out to the watch. Now we just have to find out what the value of this.writeChar is to determine the value of the characteristic to write too.
from xfkj.fitpro.service.LeService
public boolean getBluetoothGattWriteCharacteristic() {
	BluetoothGattService service;
	if (this.writeChar != null) {
		return true;
	}
	if (!this.mBluetoothGatt.discoverServices() || (service = this.mBluetoothGatt.getService(Profile.uartServiceUUID)) == null) {
		return false;
	}
	BluetoothGattCharacteristic characteristic = service.getCharacteristic(Profile.uartWriteCharacteristicUUID);
	this.writeChar = characteristic;
	return characteristic != null;
}
The above code appears to be setting this.writeChar the characteristic tied to the uartWriteCharacteristicUUID
public static final UUID uartWriteCharacteristicUUID = UUID.fromString("6e400002-b5a3-f393-e0a9-e50e24dcca9d");
Sending the commands
We now know what command to send the watch to turn on/off the find my device vibrate and to which characteristic to send it.
To turn it on we need to send the following command
byte[]{-51, 0, 6, 18, 1, 11, 0, 1, 1};
and then to turn it off we send
byte[]{-51, 0, 6, 18, 1, 11, 0, 1, 0};
And these need to be written to the following UUID
public static final UUID uartWriteCharacteristicUUID = UUID.fromString("6e400002-b5a3-f393-e0a9-e50e24dcca9d");
We need to convert the byte array into hex so that we can send it with gatttool the simplest way to do this using a little java and an online compiler like this the main reason for doing this because of the odd -51 in the first byte of the array, which is nicely explained by this article and it turns out is just 205
Code to convert the byte array to hex values
class VibrateCommand {
    /*
     * Generates the command string to turn on Vibrate for the watch.
     */
    public static void main(String[] args) {
        var b = new byte[]{-51, 0, 6, 18, 1, 11, 0, 1, 1};
        System.out.println(bytesToHex(b));
    }

    private static final char[] HEX_ARRAY = "0123456789ABCDEF".toCharArray();
    public static String bytesToHex(byte[] bytes) {
        char[] hexChars = new char[bytes.length * 2];
        for (int j = 0; j < bytes.length; j++) {
            int v = bytes[j] & 0xFF;
            hexChars[j * 2] = HEX_ARRAY[v >>> 4];
            hexChars[j * 2 + 1] = HEX_ARRAY[v & 0x0F];
        }
        return new String(hexChars);
    }
}
The above code is available on Github as well.
Which outputs
CD000612010B000101
Now we can use the following command to get the handle for the UUID we’re looking for
gatttool --device=FF:FF:FF:10:48:92 --char-desc
and find the entry for the UUID 6e400002-b5a3-f393-e0a9-e50e24dcca9d
handle = 0x0033, uuid = 6e400002-b5a3-f393-e0a9-e50e24dcca9d
Now we should have all the pieces to turn on the vibration of the watch with the following command.
gatttool --device=FF:FF:FF:10:48:92 --char-write-req --handle=0x0033 --value=CD000612010B000101
And now we can run a little test to see if this all works.
How message notifications work
In the xfkj.fitpro.service.NotifyService class you’ll find the following section of code in the sendNotifyPush() method, which contains the various notification types and a byte array to be sent for each one.
switch (c) {
            case 0:
            case 2:
                if (!isFastOfWhatsApp()) {
                    str3 = SaveKeyValues.getStringValues("WatsappState", "1");
                    bArr = new byte[]{8, 0, 0};
                    Log.i(TAG, "Watsapp!");
                    i2 = 1;
                    break;
                } else {
                    Log.i(TAG, "whatsApp data is fast!");
                    return;
                }
            case 1:
                if (!isFastOfSkype()) {
                    str3 = SaveKeyValues.getStringValues("SkypeState", "1");
                    bArr = new byte[]{6, 0, 0};
                    Log.i(TAG, "Skype!");
                    i2 = 1;
                    break;
                } else {
                    Log.i(TAG, "Skype data is fast!");
                    return;
                }
            case 3:
                if (!isFastOfLine()) {
                    str3 = SaveKeyValues.getStringValues("LineState", "1");
                    bArr = new byte[]{7, 0, 0};
                    Log.i(TAG, "Line!");
                    i2 = 1;
                    break;
                } else {
                    Log.i(TAG, "line data is fast!");
                    return;
                }
            case 4:
                Log.i(TAG, "微信信息!");
                bArr = new byte[]{3, 0, 0};
                str3 = SaveKeyValues.getStringValues("WECHATState", "1");
                i2 = 1;
                break;
            case 5:
                str3 = SaveKeyValues.getStringValues("SMSState", "1");
                bArr = new byte[]{1, 0, 0};
                Log.i(TAG, "正在发送短信!");
                i2 = 1;
                break;
            case 6:
                str3 = SaveKeyValues.getStringValues("INSTAGRAMState", "1");
                bArr = new byte[]{16, 0, 0};
                Log.i(TAG, "INSTAGRAM!");
                i2 = 1;
                break;
            case 7:
                str3 = MySPUtils.isDefalutOpenCall() ? "1" : SaveKeyValues.getStringValues("CALLState", "1");
                bArr = i == 1 ? new byte[]{1, 0} : i == 2 ? new byte[]{2, 0} : i == 0 ? new byte[]{0, 0} : null;
                Log.i(TAG, "电话信息!");
                i2 = 0;
                break;
            case '\b':
                str3 = SaveKeyValues.getStringValues("TwitterState", "1");
                bArr = new byte[]{5, 0, 0};
                Log.i(TAG, "Twitter!");
                i2 = 1;
                break;
            case '\t':
                Log.i(TAG, "QQ信息!");
                str3 = SaveKeyValues.getStringValues("QQState", "1");
                bArr = new byte[]{2, 0, 0};
                i2 = 1;
                break;
            case '\n':
            case 11:
                str3 = SaveKeyValues.getStringValues("FaceBookState", "1");
                bArr = new byte[]{4, 0, 0};
                Log.i(TAG, "FaceBook!");
                i2 = 1;
                break;
            case '\f':
                str3 = SaveKeyValues.getStringValues("linkdedInState", "1");
                bArr = new byte[]{17, 0, 0};
                Log.i(TAG, "LINKEDIN!");
                i2 = 1;
                break;
            case '\r':
                str3 = SaveKeyValues.getStringValues("KakaoTalkState", "1");
                bArr = new byte[]{9, 0, 0};
                Log.i(TAG, "KakaoTalkState!");
                i2 = 1;
                break;
            default:
                bArr = null;
                i2 = 1;
                break;
        }
Lower down in that same method you’ll find this code that builds a byte array to send the device and sends it using the SendData.getSendPushRemindValue(i2, bArr3) method.
if (bArr == null || bArr.length <= 0 || str2 == "" || str2 == null) {
            return;
        }
        String subString = getSubString(str2, 300);
        MyApplication.Logdebug(TAG, "开关状态 " + str3 + "--ID : 内容:" + subString + "--包名:" + str);
        if (str3.equals("0") || str3 == "0") {
            return;
        }
        try {
            bArr2 = subString.getBytes("UTF-8");
        } catch (UnsupportedEncodingException e) {
            e.printStackTrace();
        }
        byte[] bArr3 = new byte[bArr.length + bArr2.length];
        System.arraycopy(bArr, 0, bArr3, 0, bArr.length);
        System.arraycopy(bArr2, 0, bArr3, bArr.length, bArr2.length);
        if (Constant.BleState != 1 || Constant.mService == null) {
            return;
        }
        byte[] sendPushRemindValue = SendData.getSendPushRemindValue(i2, bArr3);
        Constant.mService.commandPoolWrite(sendPushRemindValue, "发送(" + str + ")推送命令");
The following code comes from the xfkj.fitpro.bluetooth.SendData class
    public static byte[] getSendPushRemindValue(int i, byte[] bArr) {
        return getProtocol((byte) 18, i == 1 ? (byte) 18 : (byte) 17, bArr);
    }
    public static byte[] getProtocol(byte b, byte b2, byte[] bArr) {
        Integer valueOf = Integer.valueOf(getLength().intValue() + bArr.length);
        byte[] bArr2 = new byte[valueOf.intValue()];
        bArr2[0] = -51;
        byte[] intToBytes = ByteUtil.intToBytes(valueOf.intValue() - 3);
        System.arraycopy(intToBytes, 2, bArr2, 1, intToBytes.length - 2);
        bArr2[3] = b;
        bArr2[4] = 1;
        bArr2[5] = b2;
        byte[] intToBytes2 = ByteUtil.intToBytes(bArr.length);
        System.arraycopy(intToBytes2, 2, bArr2, 6, intToBytes2.length - 2);
        System.arraycopy(bArr, 0, bArr2, 8, bArr.length);
        return bArr2;
    }
If you look at the onNotificationPosted() method in the xfkj.fitpro.service.NotifyService class that the string sent appears to follow a pattern.
    public void onNotificationPosted(StatusBarNotification statusBarNotification) {
        super.onNotificationPosted(statusBarNotification);
        String packageName = statusBarNotification.getPackageName();
        if (statusBarNotification.getPackageName().isEmpty()) {
            return;
        }
        Bundle bundle = statusBarNotification.getNotification().extras;
        String string = bundle.getString(NotificationCompat.EXTRA_TITLE);
        CharSequence charSequence = bundle.getCharSequence(NotificationCompat.EXTRA_TEXT);
        CharSequence charSequence2 = bundle.getCharSequence(NotificationCompat.EXTRA_SUB_TEXT);
        String str = "";
        if (!StringUtils.isEmpty(string)) {
            str = "" + string + ":";
            Log.e(TAG, "notificationTitle:" + string);
        }
        if (!StringUtils.isEmpty(charSequence)) {
            str = str + charSequence.toString();
            Log.e(TAG, "notificationText:" + charSequence.toString());
        }
        if (!StringUtils.isEmpty(charSequence2)) {
            str = str + charSequence2.toString();
            Log.e(TAG, "notificationSubText:" + charSequence2.toString());
        }
        if (packageName.equals(Constant.INCALL_UI)) {
            this.telNum = str;
        }
        MyApplication.Logdebug(TAG, "状态栏收到消息是 --ID :" + statusBarNotification.getId() + "--内容:" + str + "--包名:" + packageName);
        sendNotifyPush(packageName, str, 0);
        LocalBroadcastManager.getInstance(this).sendBroadcast(new Intent(ConstData.BroadCastMsg.NOTIFY_POSTED));
    }
The pattern for the message string appears to be sender:message With all of the above information we can build something to construct our own messages.
Combined with the rest of the above the full message payload becomes something like this, for a WhatsApp message, 0x800 + sender:message.
We then need to take this byte array and pass it through the getProtocol() to get the final output message.
If Notifications aren’t turned on already on the watch you’ll need to send it the “turn on notifications” command. This command is built as follows.
    public static byte[] getSetCallRemindValue() {
        String stringValues = SaveKeyValues.getStringValues("CALLState", "0");
        String stringValues2 = SaveKeyValues.getStringValues("SMSState", "0");
        String stringValues3 = SaveKeyValues.getStringValues("WECHATState", "0");
        String stringValues4 = SaveKeyValues.getStringValues("QQState", "0");
        String stringValues5 = SaveKeyValues.getStringValues("FaceBookState", "0");
        String stringValues6 = SaveKeyValues.getStringValues("TwitterState", "0");
        String stringValues7 = SaveKeyValues.getStringValues("SkypeState", "0");
        String stringValues8 = SaveKeyValues.getStringValues("LineState", "0");
        String stringValues9 = SaveKeyValues.getStringValues("WhatsappState", "0");
        String stringValues10 = SaveKeyValues.getStringValues("KakaoTalkState", "0");
        String stringValues11 = SaveKeyValues.getStringValues("INSTAGRAMState", "0");
        String stringValues12 = SaveKeyValues.getStringValues("linkdedInState", "0");
        String str = ByteUtil.algorismToHEXString(Integer.valueOf(stringValues).intValue()) + ByteUtil.algorismToHEXString(Integer.valueOf(stringValues2).intValue()) + ByteUtil.algorismToHEXString(Integer.valueOf(stringValues3).intValue()) + ByteUtil.algorismToHEXString(Integer.valueOf(stringValues4).intValue()) + ByteUtil.algorismToHEXString(Integer.valueOf(stringValues5).intValue()) + ByteUtil.algorismToHEXString(Integer.valueOf(stringValues6).intValue()) + ByteUtil.algorismToHEXString(Integer.valueOf(stringValues7).intValue()) + ByteUtil.algorismToHEXString(Integer.valueOf(stringValues8).intValue()) + ByteUtil.algorismToHEXString(Integer.valueOf(stringValues9).intValue()) + ByteUtil.algorismToHEXString(Integer.valueOf(stringValues10).intValue()) + ByteUtil.algorismToHEXString(Integer.valueOf(stringValues11).intValue());
        if (MySPUtils.isSupportMoreNotifi()) {
            str = str + ByteUtil.algorismToHEXString(Integer.valueOf(stringValues12).intValue());
        }
        return getProtocol((byte) 18, (byte) 7, ByteUtil.hexStringToBytes(str));
    }
I’ve already included this in the java code I’ve written to generate the message.
Here is some java code that will do just that and generate a message.
Sending Message Notifications
Expanding on what we found above we can use the code there to generate a notification we can send to the device.
Running the code there gets us the following notification message.
CD001F120112001A08000043657265616C3A4861636B2074686520506C616E657421
And the following command to turn on notifications.
CD0011120107000C010101010101010101010101
Now we can use the following command to get the handle for the UUID we’re looking for
gatttool --device=FF:FF:FF:10:48:92 --char-desc
and find the entry for the UUID 6e400002-b5a3-f393-e0a9-e50e24dcca9d
handle = 0x0033, uuid = 6e400002-b5a3-f393-e0a9-e50e24dcca9d
We can now construct a command to send the notification to the watch. These particular bluetooth commands we can only send 20 bytes at a time so need to split this into two commands.
gatttool --device=FF:FF:FF:10:48:92 --char-write-req --handle=0x0033 --value=CD0011120107000C010101010101010101010101
gatttool --device=FF:FF:FF:10:48:92 --char-write-req --handle=0x0033 --value=CD001F120112001A08000043657265616C3A4861
gatttool --device=FF:FF:FF:10:48:92 --char-write-req --handle=0x0033 --value=636B2074686520506C616E6574
And a test to see if this works.
Obviously this can be changed to send all kinds of different notifications.
BLE Hacking Resources
Here are some useful resources if you’re starting out with BLE hacking that explain the basics of what’s going on and the various tooling available etc.
- AdaFruit BLE Introduction a great introduction into BLE and what all the things like GATT etc are.
- Reverse Engineering a Bluetooth Low Energy Light Bulb | Adafruit Learning System a great tutorial on how to go about reverse engineering a BLE device.
OTA (Over The Air) Update
The code that fetches firmware
In the xfkj.fitpro.utils.Constant file in the decompiled code you’ll find the following constant.
public static final String TOKEN = "Bearer 6fcb7f58475b4e5aad8f0f1cadce235e";
This is a token used by xfkj.fitpro.api.HttpHelper to fetch the firmware data.
public void getOTAUpgradeInfo(Callback callback) {
        OkHttpClient okHttpClient = NetWorkManager.getInstance().getOkHttpClient();
        Request.Builder builder = new Request.Builder();
        builder.addHeader("authorization", Uri.decode(Constant.TOKEN));
        String cacheBluetoothName = MySPUtils.getCacheBluetoothName(MySPUtils.getBluetoothAddress());
        String str = "";
        String stringValues = SaveKeyValues.getStringValues("deviceVersion", "");
        if (StringUtils.isTrimEmpty(cacheBluetoothName)) {
            Log.e(this.TAG, "name is empty");
            return;
        }
        DeviceHardInfoModel deviceHardInfo = DBHelper.getDeviceHardInfo();
        int plarmType = MySPUtils.getPlarmType();
        if (plarmType == 1) {
            String telinkOTAVersionInfo = MySPUtils.getTelinkOTAVersionInfo();
            if (!StringUtils.isTrimEmpty(telinkOTAVersionInfo)) {
                if (deviceHardInfo != null) {
                    telinkOTAVersionInfo = telinkOTAVersionInfo + ":" + deviceHardInfo.getGsensor() + ":" + deviceHardInfo.getHeart() + ":" + deviceHardInfo.getLed();
                }
                str = String.format("https://tomato.gulaike.com/api/v1/config/app?name=%1$s&type=1&version=%2$s&platform=%3$d", telinkOTAVersionInfo, stringValues, Integer.valueOf(plarmType));
            }
        } else {
            if (deviceHardInfo != null) {
                cacheBluetoothName = cacheBluetoothName + ":" + deviceHardInfo.getGsensor() + ":" + deviceHardInfo.getHeart() + ":" + deviceHardInfo.getLed();
            }
            str = String.format("https://tomato.gulaike.com/api/v1/config/app?name=%1$s&type=1&version=%2$s&platform=%3$d", cacheBluetoothName, stringValues, Integer.valueOf(plarmType));
        }
        Log.e(this.TAG, "softVersionUrl:" + str);
        if (StringUtils.isTrimEmpty(str)) {
            return;
        }
        builder.url(str);
        okHttpClient.newCall(builder.build()).enqueue(callback);
    }
Example of a working firmware fetch for a different watch.
###
GET https://tomato.gulaike.com/api/v1/config/app?name=257-SW600&version=V6.5.1
Authorization: Bearer 6fcb7f58475b4e5aad8f0f1cadce235e
Managed to guess the above by using the following call.
###
GET https://tomato.jusonsmart.com/api/v1/config/app/upgrade
Authorization: Bearer 6fcb7f58475b4e5aad8f0f1cadce235e
Which returns the following
{
	"success": true,
	"data": {
		"id": 85,
		"name": "257-SW600",
		"version": "V6.5.1",
		"content": "优化用户体验",
		"status": 1,
		"type": 0,
		"force": 0,
		"display_name": "固件",
		"bundle_identifier": "",
		"version_code": 1,
		"app_down_url": "https://res.jusonsmart.com/bin/HS6620_FIRMWARE_NOUI_V01386.zip",
		"api_url": "",
		"faq_url": "https://res.jusonsmart.com/bin/HS6620_FIRMWARE_V01386.zip",
		"created_at": "2020-09-02 04:13:05",
		"updated_at": "2021-09-01 03:33:09"
	},
	"error": null
}
Going through the adb logcat from when the application is running on a phone and attempting a firmware update gets the following entry in the log.
11-17 15:28:01.842 23675 23675 E HttpHelper: softVersionUrl:https://tomato.gulaike.com/api/v1/config/app?name=LT716&type=1&version=V03767&platform=1
Converted as a call as follows
###
GET https://tomato.gulaike.com/api/v1/config/app?name=LT716&type=1&version=V03767&platform=1
Authorization: Bearer 6fcb7f58475b4e5aad8f0f1cadce235e
Unfortunately I don’t get anything back.
{ "success": true, "data": null, "error": null }
How the OTA firmware update works.
Because I’m unable to find a firmware update for the device and can’t download the firmware from the device we need a different way to figure out how to update the device.
Poking around the decompiled code, I found the following.
In the xfkj.fitpro.service.TelinkOtaUpgradeService file there is the following method.
public boolean startOTA() {
	Log.e("TelinkOtaUpgradeService", "start ota...");
	OtaSetting otaSetting = new OtaSetting();
	otaSetting.setFirmwareData(this.firmwareData);
	otaSetting.setReadInterval(8);
	this.mDevice.startOta(otaSetting);
	return false;
}
OtaSetting is a class that contains a bunch of information used for an OTA update.
Looking at the this.mDevice.startOta(otaSetting) line and looking at the code in startOta() you’ll find the following.
public void startOta(OtaSetting otaSetting) {
	if (this.otaRunning) {
		onOtaFailure(StatusCode.BUSY);
	} else if (!isConnected()) {
		onOtaFailure(StatusCode.FAIL_UNCONNECTED);
	} else {
		this.otaSetting = otaSetting;
		if (validateOtaSettings()) {
			resetOta();
			this.otaRunning = true;
			this.mOtaParser.set(otaSetting.getFirmwareData());
			this.mDelayHandler.postDelayed(
									this.mOtaTimeoutTask,
									otaSetting.getOtaTimeout());
			sendOTAPrepareCommand();
		}
	}
}
Most of this is just checking that the bluetooth is connected to the device and that an OTA update isn’t already running.
The interesting bit of the code is the line that says
this.mOtaParser.set(otaSetting.getFirmwareData());
mOtaParser is a com.telink.ota.ble.OtaPacketParser this parser takes the firmware binary file, does some magic to it and converts it into something it can send via bluetooth to the watch.
Looking at the code in the OtaPacketParser it takes the file and divides it up into 16 byte blocks and adds an index to it and a CRC16 checksum to the end.
These are then sent to the device between the OtaStart command and OtaEnd command, with the final block’s index used in the OtaEnd commands checksum calculation.
The sendOTAPrepareCommand() doesn’t actually do anything special, it just seems to connect to the watch and get things ready.
    private void sendOTAPrepareCommand() {
        onOtaStart();
        Command newInstance = Command.newInstance();
        newInstance.serviceUUID = getOtaService();
        newInstance.characteristicUUID = getOtaCharacteristic();
        newInstance.type = Command.CommandType.WRITE_NO_RESPONSE;
        newInstance.tag = 5;
        newInstance.data = new byte[]{0, -1};
        sendCommand(this.mOtaCallback, newInstance);
    }
The OtaPrepareCommand is 0x00FF
There is an additional sendOtaStartCommand() which appears to start the actual OTA update process.
    /* JADX INFO: Access modifiers changed from: private */
    public void sendOtaStartCommand() {
        Command newInstance = Command.newInstance();
        newInstance.serviceUUID = getOtaService();
        newInstance.characteristicUUID = getOtaCharacteristic();
        newInstance.type = Command.CommandType.WRITE_NO_RESPONSE;
        newInstance.tag = 7;
        newInstance.data = new byte[]{1, -1};
        sendCommand(this.mOtaCallback, newInstance);
    }
The OtaStartCommand is 0x01FF
And a sendOtaEndCommand() that sends a command combined with a sort of checksum indicating how many blocks were uploaded to the OTA endpoint.
    /* JADX INFO: Access modifiers changed from: private */
    public void sendOtaEndCommand() {
        Command newInstance = Command.newInstance();
        newInstance.serviceUUID = getOtaService();
        newInstance.characteristicUUID = getOtaCharacteristic();
        newInstance.type = Command.CommandType.WRITE_NO_RESPONSE;
        newInstance.tag = 8;
        int index = this.mOtaParser.getIndex();
        int i = ~index;
        byte[] bArr = {2, -1, (byte) (index & 255), (byte) ((index >> 8) & 255), (byte) (i & 255), (byte) ((i >> 8) & 255)};
        this.mOtaParser.fillCrc(bArr, this.mOtaParser.crc16(bArr));
        newInstance.data = bArr;
        sendCommand(this.mOtaCallback, newInstance);
    }
The OtaEndCommand is 0x02FF {Checksum}
OTA Update - OtaStartCommand Test
⚠️ WARNING All this is dangerous and has the potential to brick your device, so far I’ve not been able to figure out how to recover from any of this.
Let’s experiment now with some of the firmware update commands.
Use the following command to get the handle for the UUID we’re looking for
gatttool --device=FF:FF:FF:10:48:92 --char-desc
And find the following handle for the OTA Update service UUID 00010203-0405-0607-0809-0a0b0c0d2b12
handle = 0x003a, uuid = 00010203-0405-0607-0809-0a0b0c0d2b12
We can now try sending the watch the StartOta command by sending it 01FF.
sudo gatttool --device=FF:FF:FF:10:48:92 --char-write-req --handle=0x003a --value=01ff
The device goes into a weird state, screen black and even disconnecting power doesn’t seem to bring it out of this state.
Scanning for the device you’ll see BLE is still working but its now listed as a Telink Remote
chippy@fire:~$ sudo hcitool lescan
LE Scan ...
FF:FF:FF:10:48:92 Telink Remote
A4:C1:38:83:B5:A6 LYWSD03MMC
A4:C1:38:4F:42:F1 LYWSD03MMC
With a different, smaller set of services available.
chippy@fire:~$ gatttool --device=FF:FF:FF:10:48:92 --char-desc
handle = 0x0001, uuid = 00002800-0000-1000-8000-00805f9b34fb
handle = 0x0002, uuid = 00002803-0000-1000-8000-00805f9b34fb
handle = 0x0003, uuid = 00002a00-0000-1000-8000-00805f9b34fb
handle = 0x0004, uuid = 00002803-0000-1000-8000-00805f9b34fb
handle = 0x0005, uuid = 00002a01-0000-1000-8000-00805f9b34fb
handle = 0x0006, uuid = 00002803-0000-1000-8000-00805f9b34fb
handle = 0x0007, uuid = 00002a04-0000-1000-8000-00805f9b34fb
handle = 0x0008, uuid = 00002800-0000-1000-8000-00805f9b34fb
handle = 0x0009, uuid = 00002803-0000-1000-8000-00805f9b34fb
handle = 0x000a, uuid = 00002a05-0000-1000-8000-00805f9b34fb
handle = 0x000b, uuid = 00002902-0000-1000-8000-00805f9b34fb
handle = 0x000c, uuid = 00002800-0000-1000-8000-00805f9b34fb
handle = 0x000d, uuid = 00002803-0000-1000-8000-00805f9b34fb
handle = 0x000e, uuid = 00002a50-0000-1000-8000-00805f9b34fb
handle = 0x000f, uuid = 00002800-0000-1000-8000-00805f9b34fb
handle = 0x0010, uuid = 00002803-0000-1000-8000-00805f9b34fb
handle = 0x0011, uuid = 00010203-0405-0607-0809-0a0b0c0d2b12
handle = 0x0012, uuid = 00002901-0000-1000-8000-00805f9b34fb
I wonder if this is not some kind of recovery mode or something where the watch runs a simpler firmware image for recovery or to do the actual update?
OTA Parser
⚠️ WARNING All this is dangerous and has the potential to brick your device, so far I’ve not been able to figure out how to recover from any of this.
Using what we learnt earlier and the OtaParser class from the Android App we can build something that generates gatttool command lines I can stick in a script.
The java application will take a firmware file and convert it into a series of gatttool commands we can run to update the firmware.
Java code generates the following commands which we can put in aOTA-update.sh script.
gatttool -b FF:FF:FF:10:48:92 --char-write-req --handle=0x0011 --value=00FF
gatttool -b FF:FF:FF:10:48:92 --char-write-req --handle=0x0011 --value=01FF
gatttool -b FF:FF:FF:10:48:92 --char-write-req --handle=0x0011 --value=00000E80000000005D024B4E4C5480018800347C
gatttool -b FF:FF:FF:10:48:92 --char-write-req --handle=0x0011 --value=01005E80000000000000D493000000000000B786
gatttool -b FF:FF:FF:10:48:92 --char-write-req --handle=0x0011 --value=020025082609260A910202CA085004B1FA87A70D
...
gatttool -b FF:FF:FF:10:48:92 --char-write-req --handle=0x0011 --value=3B09E177AD9200000200FFFFFFFF80C3C901A069
gatttool -b FF:FF:FF:10:48:92 --char-write-req --handle=0x0011 --value=3C0980000000FFFFFFFFFFFFFFFFFFFFFFFF5FCB
gatttool -b FF:FF:FF:10:48:92 --char-write-req --handle=0x0011 --value=3D091C04EE7FFFFFFFFFFFFFFFFFFFFFFFFF268C
gatttool -b FF:FF:FF:10:48:92 --char-write-req --handle=0x0011 --value=02FF3D09E13A
When we run the script nothing appears to really happen, the commands are all successfully sent but the watch does nothing.
If we run a scan though you’ll see it no longer appears on bluetooth.
chippy@fire:~$ sudo hcitool lescan
LE Scan ...
A4:C1:38:83:B5:A6 LYWSD03MMC
A4:C1:38:4F:42:F1 LYWSD03MMC
It appears the device is now properly bricked and there is no way to communicate with it over BLE.
I suspect that it’s running code, however in some kind of error state or something.
I do think it’s recoverable if we can get SWS Debug working.
SWS Debug
Single Wire Slave/Serial
Is a proprietary 2-wire debug interface used with the TeLink SoC’s (It’ their answer to ARM’s Single Wire Debug (SWD))
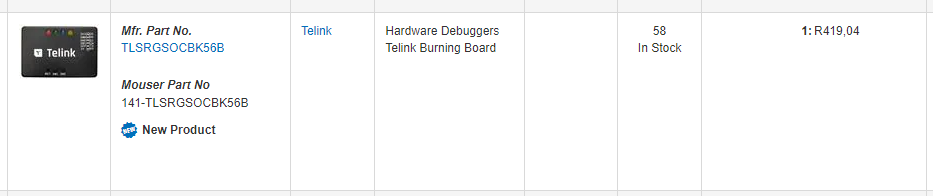
A programmer is available from Mouser - TLSRGSOCBK56B
Open source alternatives
-
Victor (PVVX) on Github created firmware that turns a STM32 “Blue Pill” Dev Board into a SWS programmer. https://github.com/pvvx/TlsrTools
And has a few other alternative programmers using serial for some of the other TLSR8* SoC’s
-
Raphael (RBaron) on Github created a Python Script that can use the STM32 to reprogram a TLS8232 SoC https://github.com/rbaron/m6-reveng/tree/main/tlsr82-debugger-client
Building a SWIreSTM32 - “Blue Pill” based programmer
Got a STM32 “blue pill” board from DIY Electronics
You’ll need to install stlink-tools https://github.com/stlink-org/stlink to be able to use a stlink programmer to program the blue-pill board. (This can also be done over serial etc)
Write USB2Swire-STM32F103C8-v06.hex from Tlsrtools to the blue-pill board using a st-link v2 programmer.
chippy@fire:~/Downloads$ st-flash --format ihex --reset write ~/Downloads/USB2Swire-STM32F103C8-v06.hex
st-flash 1.7.0
2022-08-25T21:04:49 INFO common.c: F1xx Medium-density: 20 KiB SRAM, 64 KiB flash in at least 1 KiB pages.
2022-08-25T21:04:49 INFO common.c: Attempting to write 12648 (0x3168) bytes to stm32 address: 134217728 (0x8000000)
2022-08-25T21:04:49 INFO common.c: Flash page at addr: 0x08000000 erased
2022-08-25T21:04:49 INFO common.c: Flash page at addr: 0x08000400 erased
2022-08-25T21:04:49 INFO common.c: Flash page at addr: 0x08000800 erased
2022-08-25T21:04:49 INFO common.c: Flash page at addr: 0x08000c00 erased
2022-08-25T21:04:49 INFO common.c: Flash page at addr: 0x08001000 erased
2022-08-25T21:04:49 INFO common.c: Flash page at addr: 0x08001400 erased
2022-08-25T21:04:49 INFO common.c: Flash page at addr: 0x08001800 erased
2022-08-25T21:04:49 INFO common.c: Flash page at addr: 0x08001c00 erased
2022-08-25T21:04:49 INFO common.c: Flash page at addr: 0x08002000 erased
2022-08-25T21:04:49 INFO common.c: Flash page at addr: 0x08002400 erased
2022-08-25T21:04:49 INFO common.c: Flash page at addr: 0x08002800 erased
2022-08-25T21:04:49 INFO common.c: Flash page at addr: 0x08002c00 erased
2022-08-25T21:04:49 INFO common.c: Flash page at addr: 0x08003000 erased
2022-08-25T21:04:49 INFO common.c: Finished erasing 13 pages of 1024 (0x400) bytes
2022-08-25T21:04:49 INFO common.c: Starting Flash write for VL/F0/F3/F1_XL
2022-08-25T21:04:49 INFO flash_loader.c: Successfully loaded flash loader in sram
2022-08-25T21:04:49 INFO flash_loader.c: Clear DFSR
 13/ 13 pages written
2022-08-25T21:04:50 INFO common.c: Starting verification of write complete
2022-08-25T21:04:50 INFO common.c: Flash written and verified! jolly good!
2022-08-25T21:04:50 WARN common.c: NRST is not connected
chippy@fire:~/Downloads$
SWIreSTM32 + tlsr82-debugger-client.py
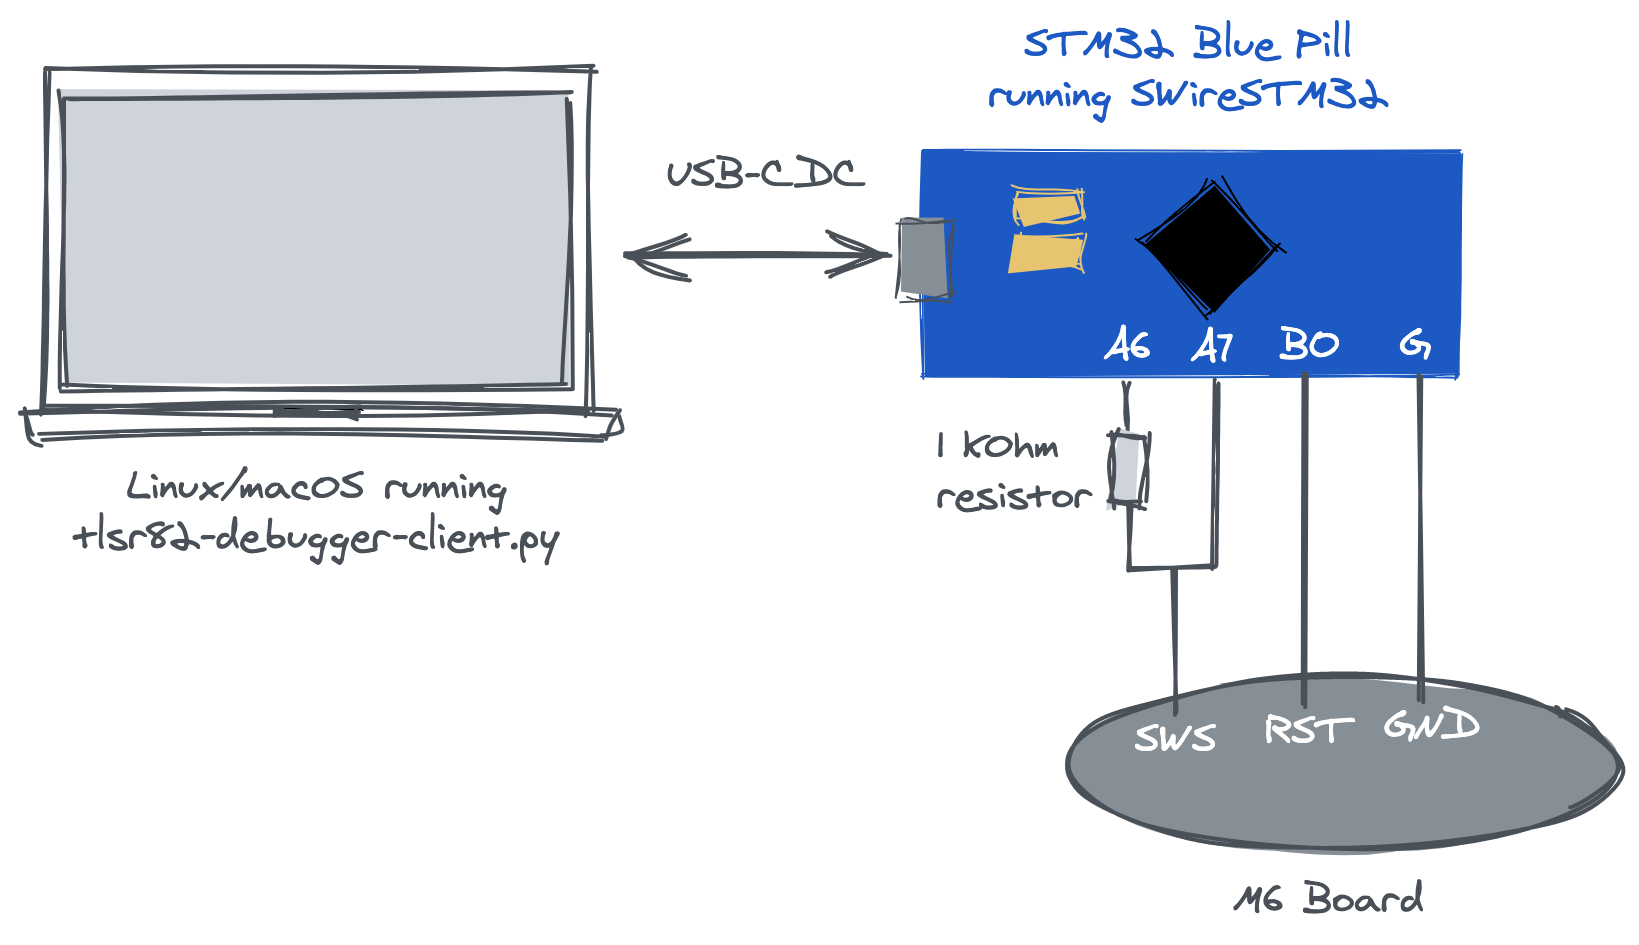 Image from https://github.com/rbaron/m6-reveng
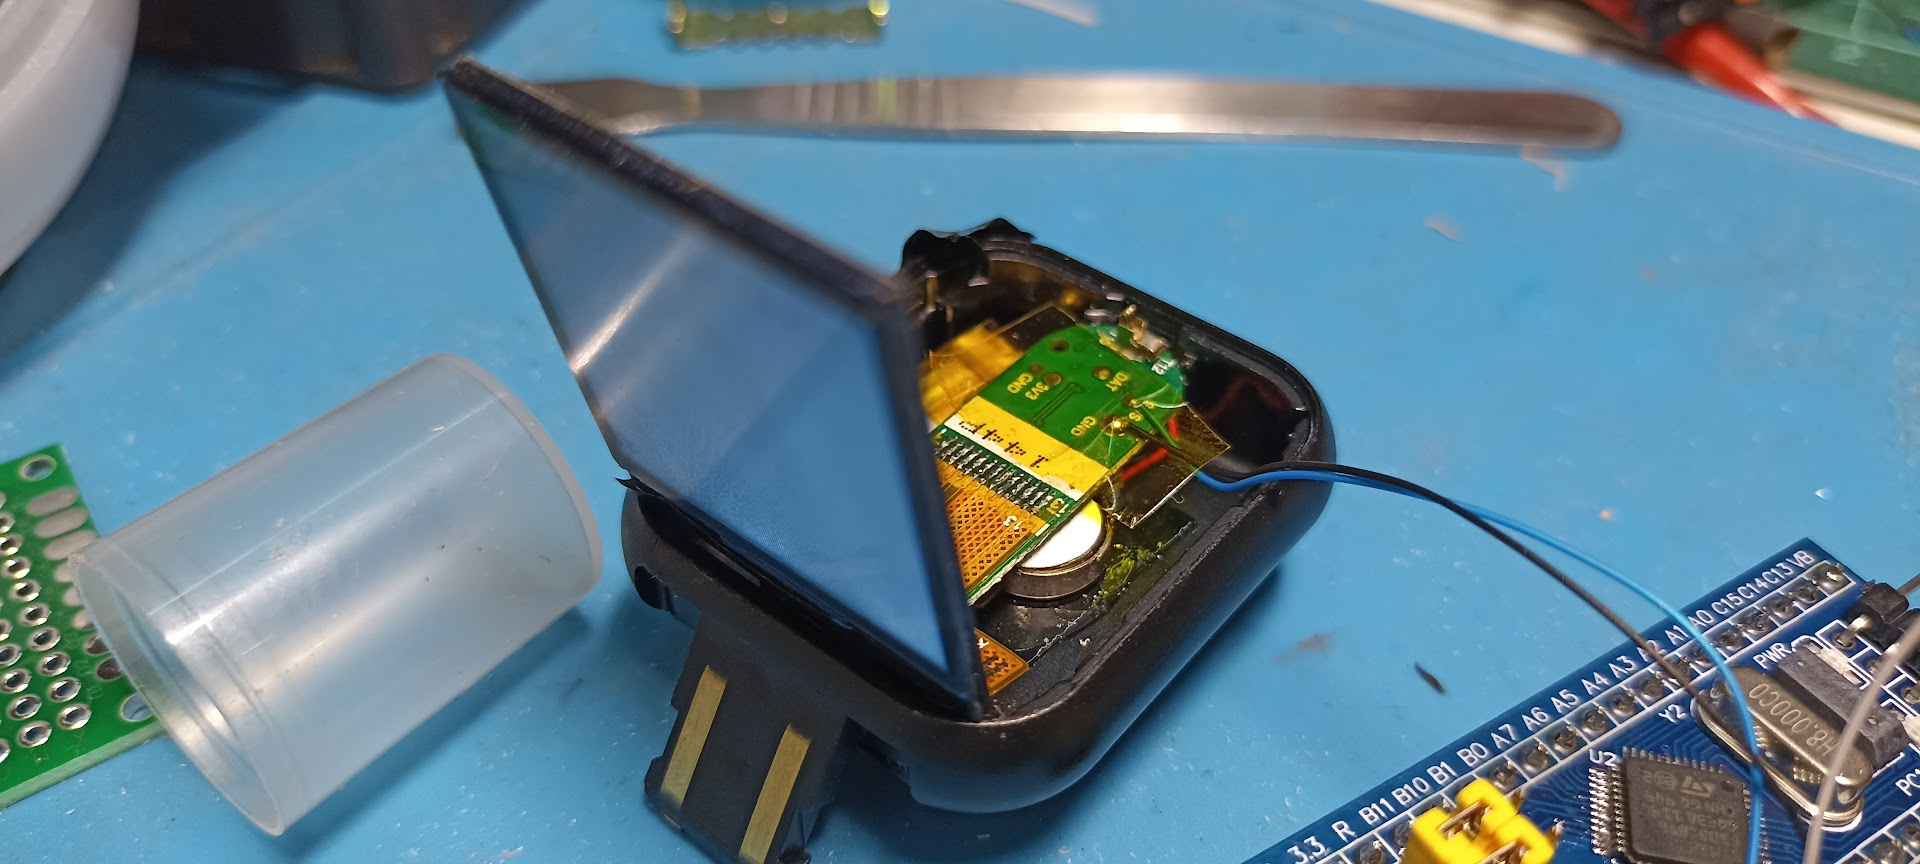
Soldered wires to the SWS and GND test points on the watch.
Running the tls82-debugger-client.py script
sudo python tlsr82-debugger-client.py --serial-port /dev/ttyACM0 --debug get_soc_id
Trying speed 2
Trying speed 3
Trying speed 4
...
Trying speed 125
Trying speed 126
Traceback (most recent call last):
  File "tlsr82-debugger-client.py", line 401, in <module> main()
  File "tlsr82-debugger-client.py", line 397, in main args.func(args)
  File "tlsr82-debugger-client.py", line 349, in get_soc_id_main   init_soc(args.sws_speed)
  File "tlsr82-debugger-client.py", line 267, in init_soc    find_suitable_sws_speed()
  File "tlsr82-debugger-client.py", line 109, in find_suitable_sws_speed raise RuntimeError("Unable to find a suitable SPI speed")
RuntimeError: Unable to find a suitable SPI speed
The error is because it’s not able to figure out the connection speed. I’ve tried a lot of different combinations here but I just can’t seem to get this to work.
I think the “write” is going through as you can get the watch to halt / hang which I assume is the CPU HALT command getting executed over SWS, my guess is for some reason, possibly as it can’t negotiate the speed, it’s unable to read anything.
Firmware
So far we’ve looked at the hardware, the original app and BLE, next is the software actually running on the watch.
As we can’t get a SWS Debugger to work reliably we’re unable to dump the existing firmware and we’re unable to find a copy to download via the app (look at the section How the OTA firmware update works ) we’re going to attempt to build some of the example code from the SDK and flash that to the device.
A SDK is available from Telink packaged in their IDE which you can download here
However I found this Docker image that has the TC32 compiler and the SDK packaged together for building software for this SoC.
⚠️ Warning - The image we’re building here is just a sample project in the SDK that happens to support OTA updates so it will most likely brick the watch.
Let’s build the 5316_remote_ble demo project that comes with the SDK which is for a simple BLE Remote control. The reason for building this particular firmware image is that it has a working OTA update (or at least appears to) which gives us a way to replace the firmware if we have too, assuming it even runs of course.
We’ll change the bluetooth name to DALE-BLE in the app.c file so that we know if this worked or not.
const u8 tbl_scanRsp [] = {
	0x08, 0x09, 'D', 'A', 'L', 'E', 'B', 'L', 'E',
};
This builds a 5316_ble_remote.bin file which should be an image we can upload to the device using our OTA Parser scripts.
However as explained in that section this did not work and ended up bricking the watch.
Conclusion
We’re able to easily control the watch over bluetooth, while only the message notification and vibrate functions are documented in this document the rest of the functionality is easily reversed engineered using similar methods.
Since writing this document and sharing it with a few select people we’ve been able to acquire what looks like valid binary firmware images which means there may be a way to start reversing the OTA software update and the various boot modes in more detail which could allow more reliable OTA updates.
Further work needs to be done on getting a SWS debugger working or I need to purchase an official one, with that I should be able to recover the bricked watches and move forward on writing new replacement firmware for the watch in a much safer way.
Useful Links
- Github repo containing the code and scripts mentioned in this blog post.
- Reverse Engineering the M6 Smart Fitness Bracelet | rbaron.net - A similar watch to the one I hacked, using the same SoC however it’s the 32pin version with the RST pin.
- Dollar Bin Reverse Engineering — Jakob’s Personal Webpage - Good writeup on flashing a similar watch over bluetooth.
- Hacking a $5 Smartband.| by Sayli Ambure | Medium - Interesting article on reversing the bluetooth protocol used in a similar watch.
- Hacking Smartwatches for Spear Phishing – Cybervelia | Cyber Security - The watch hacked in this blog post happens to use the same protocol and app as mine.
Opensource SWS/Swire programmers
- pvvx/TlsrTools: Alternative programmer for TLSR8269
- pvvx/TlsrComSwireWriter: TLSR826x/825x COM port Swire Writer
- pvvx/TlsrComProg: TLSR826x programmer via COM port
BLE Hacking / Information
- AdaFruit BLE Introduction a great introduction into BLE and what all the things like GATT etc are.
- Reverse Engineering a Bluetooth Low Energy Light Bulb | Adafruit Learning System a great tutorial on how to go about reverse engineering a BLE device.
